Introduction

As a business owner or marketer, understanding our customers’ lifetime value is crucial to maximizing our profits and improving the overall marketing strategy. In this blog post, let’s go through the process of predicting customer lifetime value using cohort analysis in Python.

Cohort analysis is a powerful technique that helps businesses identify groups of customers with similar characteristics and behaviors. By grouping customers into cohorts, we can better understand how their behavior changes over time and predict their future actions. Using Python, I’ll show you how to calculate key metrics such as retention rates and lifetime values for each cohort.

But simply calculating these metrics is not enough - we also need to use machine learning techniques to predict future customer behavior. In this post, I’ll show you how to use a popular ensemble learning method called random forest to predict future customer lifetime value based on past behavior.

Even if you’re new to Python or machine learning, this post will provide you with a step-by-step guide on how to use these powerful techniques to make better decisions about your customers. Whether you’re a marketer looking to optimize your campaigns or a business owner looking to improve your profits, understanding customer lifetime value is critical to success. So let’s get started!
Understanding Cohort Analysis:

Cohort analysis is a powerful tool that can help businesses make data-driven decisions and optimize their customer engagement and retention strategies. By grouping customers based on shared characteristics and analyzing their behavior over time, businesses can gain valuable insights into customer behavior and make informed decisions about how to grow and succeed in a competitive marketplace.

One common way to perform cohort analysis is to group customers by the month in which they made their first purchase. This allows us to compare how different cohorts of customers behave over time, and identify patterns and trends in customer behavior.

For example, let’s say we have an online clothing store. We can group our customers into cohorts based on the month they made their first purchase and track how much they spend over time. By comparing different cohorts, we might find that customers who made their first purchase in December tend to spend more overall than customers who made their first purchase in January.

Another important metric we can calculate using cohort analysis is the retention rate. The retention rate measures the percentage of customers who make a repeat purchase after their initial purchase. By tracking retention rates for different cohorts, we can see how customer loyalty and engagement change over time.

Using cohort analysis, we can also calculate customer lifetime value (CLTV), which is a measure of how much revenue a customer is expected to generate over their lifetime. Understanding CLTV for different customer cohorts can help us make strategic decisions about marketing, customer acquisition, and product development.

Lastly, by combining cohort analysis with machine learning, businesses can gain a deeper understanding of their customers and make more accurate predictions about their future behavior.

How do we compute Customer LifeTime Value:

While there is no one-size-fits-all solution for predicting customer lifetime value, the traditional CLTV model is a proven method that has been used successfully by businesses for decades. The calculation is quite effective because it takes into account the Customer Retention Rate, Profit Margin, Discount Rates, and the average number of transactions over the life span of the customers.

1) Avg. Profit Margin Per Customer Life Span = The average profit we make on each customer over the span of their lifetime. It is essentially the product of the following: Average Revenue per customer * yearly profit margin * avg. no. of purchases per customer life span * customer life span

2) Customer Retention Rate = The number of cycles that we expect the customer to keep purchasing from us.

3) Discount Rate = This is the interest rate applied in discounted cash flow analysis to learn the current value of future cash flows.

In the next section, let’s go through a step-by-step guide to perform cohort analysis in Python and use it to predict customer lifetime value.

Data Preparation:

Importing and Preprocessing the Data: We will be using a publicly available transactional customer dataset from an online retail store in the UK. The dataset is available in the GitHub Repository that we will be using for this tutorial. Before we begin analyzing the data, we need to perform some preprocessing steps to ensure that the data is in a format that can be easily analyzed.

In this section, I’ll share the Python code that we used to clean and prepare the data for the predictive analytics of Retention Rate and Customer Life Time Value (CLTV). I’ll also provide comments to explain the code and summarize the key steps to make it easy to follow along. So let’s dive in!

Step 0:Restart the session and clear all temporary variables:

try:
    from IPython import get_ipython
    get_ipython().magic('clear')
    get_ipython().magic('reset -f')
except:
    pass

Step 1:Import relevant libraries:

Import all the relevant Python libraries for building supervised machine learning algorithms.

#Standard libraries for data analysis:

import numpy as np
import matplotlib.pyplot as plt
import pandas as pd
from scipy.stats import norm, skew
from scipy import stats
import statsmodels.api as sm

# sklearn modules for data preprocessing:

from sklearn.impute import SimpleImputer
from sklearn.preprocessing import LabelEncoder, OneHotEncoder
from sklearn.compose import ColumnTransformer
from sklearn.preprocessing import OneHotEncoder
from sklearn.preprocessing import StandardScaler

#sklearn modules for Model Selection:

from sklearn.ensemble import RandomForestRegressor
from sklearn.neighbors import KNeighborsRegressor
from sklearn.experimental import enable_hist_gradient_boosting  # Required to enable HGBR
from sklearn.ensemble import HistGradientBoostingRegressor


#sklearn modules for Model Evaluation & Improvement:

from sklearn.model_selection import train_test_split
from sklearn.metrics import r2_score
from sklearn.model_selection import train_test_split, RandomizedSearchCV

#Standard libraries for data visualization:

import seaborn as sns
from matplotlib import pyplot
import matplotlib.pyplot as plt
import matplotlib.pylab as pylab
import matplotlib.colors as mcolors
import matplotlib 
%matplotlib inline
color = sn.color_palette()
import matplotlib.ticker as mtick
from IPython.display import display
pd.options.display.max_columns = None
from pandas.plotting import scatter_matrix
from sklearn.metrics import roc_curve

#Miscellaneous Utilitiy Libraries:

import random
import os
import re
import sys
import timeit
import string
import time
import warnings
from datetime import datetime
from time import time
from operator import attrgetter
from dateutil.parser import parse
import joblib

Step 2:Set up the current working directory:

os.chdir(r"C:/Users/srees/Propensity Scoring Models/Predict Customer lifetime value/")

Step 3:Import the dataset:

Let’s load the input dataset into the Python notebook in the current working directory.

1) dtype is defined for the customer_id and transaction_id columns.

2) parse_dates is defined for the transaction_date column.

dataset = pd.read_excel('online_retail_monthly.xlsx',
                   dtype={'customer_id': str,
                          'transaction_id': str},
                   parse_dates=['transaction_date'])


df = dataset

The imported dataset is stored in the df variable.

Step 4:Evaluate the data structure:

df.head()

df.columns

df.describe()

The output of the describe() method provides a quick summary of the key statistical measures of the numerical columns in our dataset. It can help us to get a general understanding of our dataset and detect any outliers, missing values, or potential data quality issues. In our case, it shows the summary statistics of the “quantity”, “price”, and “transaction_amount” columns.
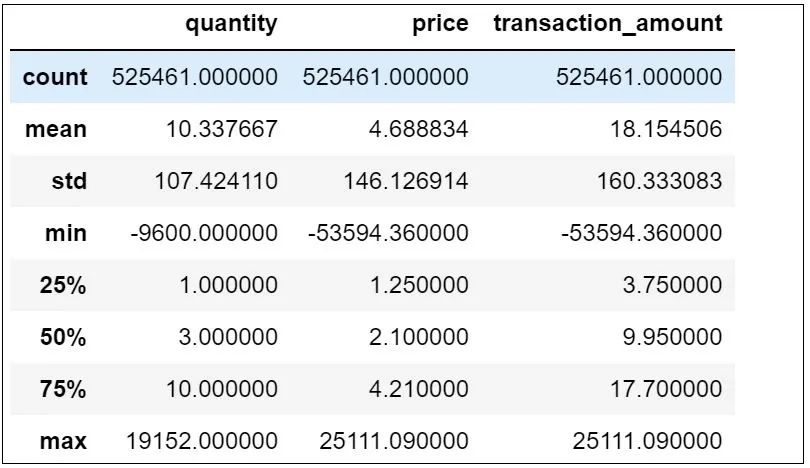
From the output, we can observe that the average “quantity” is around 12, the average “price” is around 3, and the average “transaction_amount” is around 20. The standard deviation (std) of these variables is quite high, indicating that they are dispersed across a wide range of values. Additionally, the minimum and maximum values of each variable indicate the range of values they can take. The median or the 50th percentile (50%) of the variables is closer to the 25th percentile (25%) than the 75th percentile (75%), which suggests that the distribution of these variables might be skewed to the right.

Ensure column data types and identify missing values:

It is crucial to constantly monitor missing values within a dataset, as they can adversely affect model construction and accuracy.

df.columns.to_series().groupby(df.dtypes).groups

df.isna().any()

The output of the code snippet “df.isna().any()” shows which columns in our dataset contain missing values (NaN). In our case, three columns have missing values: “transaction_item_description”, “customer_id”, and “first_transaction_month”.

It’s important to handle missing values before performing any analysis on the data as they can lead to biased or inaccurate results. We can either remove the rows with missing values or impute the missing values with appropriate methods depending on the context and nature of the missing data.

Step 5: Clean the dataset:

df = df.dropna(subset=["transaction_id", "customer_id", "transaction_date", "first_transaction_month"])

This will drop all rows that have missing values in any of the specified columns (i.e., “transaction_id”, “customer_id”, “transaction_date”, and “first_transaction_month”) and return a new DataFrame.

# Replace NA's in "transaction_amount" with 0
df["transaction_amount"].fillna(0, inplace=True)

# Filter data & select only monthly FMCG transactions in UK
df = df[(df["frequency_of_payment"] == "monthly") & 
        (df["product_type"] == "fast_moving_consumer_goods") & 
        (df["country"] == "United Kingdom")]

#Filter out all the returns
df = df.query('quantity > 0')

Cohort Analysis:

To perform cohort analysis, businesses typically follow a few key steps. First, they identify the cohort groups they want to analyze, such as customers who made their first purchase in a given month. Then, they calculate retention rates for each cohort group over time, which shows how many customers from each group remain active over time. And then they compute Customer Lifetime Value.

In the following sections, I’ll walk you through the steps to prepare the data for analysis and generate valuable insights.

Step 6: Retention Rate:

In the code snippet provided, we first converted the “first_transaction_month” and “transaction_date” columns into datetime format and grouped customers by their first transaction month. We then computed the retention rate for each cohort by finding the percentage of customers who remained active in each subsequent period.

Finally, we calculated the churn rate as the complement of the retention rate, or the percentage of customers who did not remain active. This information can be extremely useful in understanding customer behavior over time and optimizing marketing and engagement efforts.

# Convert the 'first_transaction_month' column into a monthly period

df['first_transaction_month'] = pd.to_datetime(df['first_transaction_month'], format='%Y-%m-%d').dt.to_period('M')

# Convert the 'transaction_date' column into a monthly period

df["record_level_transaction_month"] = df["transaction_date"].dt.to_period('M')

# Rename the 'first_transaction_month' column as 'cohort'

df.rename(columns={'first_transaction_month': 'cohort'}, inplace=True)

# Calculate the number of unique customers per cohort and 'record level transaction month'

df_cohort_1 = (df
    .groupby(["cohort", "record_level_transaction_month"])
    .agg(no_of_customers=("customer_id", "count"))
    .reset_index()
)

# Compute the difference in months/periods between 'cohort' and 'record_level_transaction_month'

df_cohort_1['period_number'] = df_cohort_1.apply(lambda row: (row['record_level_transaction_month'] - row['cohort']).n, axis=1)

# Calculate the total number of customers in the cohort and the retention rate for each period

mask1 = df_cohort_1['period_number'] == 0
interim_tbl = df_cohort_1.loc[mask1, ['cohort', 'no_of_customers']].rename(columns={'no_of_customers': 'total_customers'})
df_cohort_1 = df_cohort_1.merge(interim_tbl, on='cohort', how='left')
df_cohort_1['retention_rate_%'] = (100 * df_cohort_1['no_of_customers'] / df_cohort_1['total_customers']).round(2)

# Calculate the churn rate as the complement of the retention rate, and handle zero churn rates

df_cohort_1["churn_rate_%"] = (100 - df_cohort_1["retention_rate_%"]).round(2)
df_cohort_1.loc[df_cohort_1["churn_rate_%"] == 0.00, "churn_rate_%"] = 100

Step 7: Active & Lost Customers:

Once the cohort analysis has been performed, we can use the resulting cohort groups to identify active and lost customers over time. This can be done by calculating the number of customers who remain active in each cohort group over time, as well as the number of customers who become inactive. Finally, we merged this information back into the original cohort analysis DataFrame and rearranged the columns for readability.

By identifying active and lost customers over time, businesses can gain valuable insights into how customer behavior changes over time, and develop more accurate and effective strategies for retaining customers and maximizing customer lifetime value. This can lead to increased customer loyalty, higher revenues, and greater long-term success for the business.

# Assign the number of active customers in each passing year of a cohort to the "active_cust" column

df_cohort_1 = df_cohort_1.assign(active_cust=df_cohort_1["no_of_customers"])

# Compute the lost customers for each cohort and period by taking the difference between the current and previous period's "active_cust" values

lost_customers = (
    df_cohort_1
    .groupby(['cohort', 'record_level_transaction_month', 'period_number'])['active_cust']
    .sum()
    .groupby(level=0)
    .diff()
    .abs()
    .reset_index(name='lost_cust')
)

# Merge the "lost_customers" data back into the original "df_cohort_1" DataFrame

df_cohort_1 = df_cohort_1.merge(lost_customers, on=['cohort', 'record_level_transaction_month', 'period_number'], how='left')

# Replace any missing "lost_cust" values with the corresponding "active_cust" values

df_cohort_1['lost_cust'].fillna(df_cohort_1['active_cust'], inplace=True)

#Rearrange the column positions:

select = ['cohort', 'record_level_transaction_month', 'period_number', 'no_of_customers', 'retention_rate_%', 'churn_rate_%', 'active_cust', 'lost_cust']
df_cohort_1 = df_cohort_1.loc[:, select]


Step 8: Cumulative Revenue:

In the code below, we have computed cumulative revenue for each cohort and period. This allows us to see how much revenue each cohort generates over time, and how it compares to other cohorts.

# Aggregate revenue data by cohort and record level transaction month
  
df_cohort_2 = (
    df.groupby(["cohort", "record_level_transaction_month"])
    ["transaction_amount"]
    .sum()
    .reset_index(name="revenue")
)

# Calculate the time difference in months between cohort and transaction month
         
df_cohort_2['period_number'] = (df_cohort_2.record_level_transaction_month - df_cohort_2.cohort).apply(attrgetter('n'))

# Compute cumulative revenue for each cohort and period

cumulative_revenue = (df_cohort_2
                     .groupby(['cohort', 'record_level_transaction_month', 'period_number'])['revenue']
                     .sum()
                     .groupby(level=0)
                     .cumsum()
                     .rename('cumulative_revenue')
                     .reset_index())

# Merge cumulative revenue data into the original cohort analysis

df_cohort_2 = df_cohort_2.merge(cumulative_revenue, on=['cohort', 'record_level_transaction_month', 'period_number'], how='left')

# Rearrange columns for readability

df_cohort_2 = df_cohort_2[['cohort', 'record_level_transaction_month', 'period_number', 'revenue', 'cumulative_revenue']]

Step 9: Average Revenue per User (ARPU):

# Merge two cohort dataframes on specific columns

df_cohort_final = pd.merge(df_cohort_1, df_cohort_2, on=['cohort', 'record_level_transaction_month', 'period_number'], how='left')

# Calculate average revenue per user for each cohort and time period

df_cohort_final["avg_revenue_per_user"] = df_cohort_final["cumulative_revenue"] / df_cohort_final["no_of_customers"]

# Round the average revenue per user to 2 decimal places

df_cohort_final["avg_revenue_per_user"] = df_cohort_final["avg_revenue_per_user"].round(2)

Step 10: Customer Life Time Value (CLTV):

In this code, we prepared our transactional customer dataset to compute the customer lifetime value. After cleaning the data, we grouped the transactions by customer ID to get the first transaction date of each customer. And then we calculated the number of periods between the transaction date & cohort date to identify the months of customer journey.

# CLTV Computation - Part 1:

# Create a copy of the original dataset to avoid modifying it directly

dataset_1 = dataset.copy()

# Remove transactions with missing transaction dates

dataset_1 = dataset_1[pd.notnull(dataset_1["transaction_date"])]

# Convert transaction_date column to datetime data type

dataset_1['transaction_date'] = dataset_1['transaction_date'].astype('datetime64')

# Group transactions by customer ID and get the first transaction date for each customer

first_transaction_date = dataset_1.groupby('customer_id')['transaction_date'].agg('min')

# Merge the first_transaction_date column into the original dataset

dataset_1 = dataset_1.merge(first_transaction_date, how='left', on='customer_id', suffixes=('', '_first'))

# Rename the new column to first_transaction_date

dataset_1.rename(columns={'transaction_date_first': 'first_transaction_date'}, inplace=True)

# Remove rows with missing first_transaction_date values

dataset_1.dropna(subset=['first_transaction_date'], inplace=True)

#Convert date columns to datetime format and then back to string format

date_cols = ["transaction_date", "first_transaction_date"]
dataset_1[date_cols] = dataset_1[date_cols].apply(pd.to_datetime, format='%Y-%m-%d').astype(str)

# Converts the "transaction_date" and "first_transaction_date" columns in "dataset_1" from strings to datetime objects 
#using the "apply()" method and assigns the results back to the same columns.

dataset_1[["transaction_date", "first_transaction_date"]] = dataset_1[["transaction_date", "first_transaction_date"]].apply(pd.to_datetime)

# Adds two new columns to dataset_1 with the year of each transaction.

dataset_1 = dataset_1.assign(first_transaction_yr=dataset_1['first_transaction_date'].dt.to_period('Y'),
                             record_level_transaction_yr=dataset_1['transaction_date'].dt.to_period('Y'))

# Convert date columns into year-month period format and assign to new columns

dataset_1[['first_transaction_yr_month', 'record_level_transaction_yr_month']] = dataset_1[['first_transaction_date', 'transaction_date']].apply(lambda x: x.dt.to_period('M'))

dataset_1.rename(columns={'first_transaction_yr_month':'cohort'}, inplace = True)

# Calculate the number of periods between transaction date and cohort date

dataset_1['period_number'] = (dataset_1.record_level_transaction_yr_month - dataset_1.cohort).apply(attrgetter('n'))

dataset_1.query("cohort >= '2009-12'", inplace=True)

# Filter dataset_1 to include only records from past cohorts and exclude current month

today_str = datetime.today().strftime('%Y-%m')
dataset_1 = dataset_1[(dataset_1["cohort"] < today_str) & (dataset_1["record_level_transaction_yr_month"] != today_str)] 


The following segment of the code involved grouping our data by a specific set of columns, such as cohort and transaction month, and then figuring out the number of unique transactions and the number of purchases per customer.

#CLTV Computation - Part 2: 

df_cohort_final.rename(columns={'record_level_transaction_month':'record_level_transaction_yr_month'}, inplace = True)

# Defining the column names for grouping the dataset

column_names  = ['cohort','record_level_transaction_yr_month' ,'period_number' ]

# Grouping the dataset by specified column names

sector = dataset_1.groupby (column_names)

# Aggregating transaction_id and customer_id columns by counting unique values

df_cohort_3 = sector.agg({"transaction_id" : "nunique", 
             "customer_id" : "nunique"})

# Calculating the number of purchases per customer

df_cohort_3["no_of_cust_purchases"] =  df_cohort_3["transaction_id"] / df_cohort_3["customer_id"]

df_cohort_3["no_of_cust_purchases"]  = round(df_cohort_3["no_of_cust_purchases"], 1)

# Merging df_cohort_final with df_cohort_3 on specified columns

df_cohort_final = pd.merge(df_cohort_final,df_cohort_3, on=['cohort','record_level_transaction_yr_month' ,'period_number'], how='left') 

df_cohort_final = df_cohort_final.rename(columns={'transaction_id':'total_transactions', 'customer_id':'total_customers'})

# Adding a new column period_number_for_cltv which is period_number+1

df_cohort_final["period_number_for_cltv"] = df_cohort_final["period_number"] +1

# Calculating the retention rate for each cohort by grouping and shifting the retention_rate_% column

df_cohort_final["retention_rate_for_cltv"] = df_cohort_final.groupby(["cohort"])["retention_rate_%"].shift(-1)

In this part of the code, we grouped the data by ‘cohort’ to calculate the average retention rate for each cohort. This average retention rate is then merged back into the original data frame, and used to calculate the average profit margin for each cohort. Finally, a traditional customer lifetime value (LTV) is computed for each row using the average profit margin, retention rate, and discount rate. As I mentioned earlier, the traditional LTV is nothing but a metric that helps us to determine how much we can spend on acquiring & retaining customers while generating profit.

#CLTV Computation - Part 3:

column_names  = ['cohort']

# Group the dataframe 'df_cohort_final' by the column 'cohort'

sector = df_cohort_final.groupby (column_names)

# Compute the mean of the 'retention_rate_for_cltv' column for each group 

interim_tbl2 = sector.agg({"retention_rate_for_cltv" : "mean"})

interim_tbl2.rename(columns={'retention_rate_for_cltv':'retention_rate_cohort_avg'}, inplace = True)

# Merge the 'interim_tbl2' dataframe with 'df_cohort_final' on the 'cohort' column

df_cohort_final = pd.merge(df_cohort_final,interim_tbl2, on=['cohort'], how='left')

df_cohort_final["retention_rate_cohort_avg"] = pd.to_numeric(df_cohort_final["retention_rate_cohort_avg"], errors="coerce").round(1)

df_cohort_final["retention_rate_for_cltv"].fillna(df_cohort_final["retention_rate_cohort_avg"], inplace=True)

# Compute 'avg_profit_margin_per_cohort' column by multiplying different columns of 'df_cohort_final'

df_cohort_final["avg_profit_margin_per_cohort"] = np.multiply(
    np.multiply(df_cohort_final["avg_revenue_per_user"], 0.2),
    np.multiply(df_cohort_final["period_number_for_cltv"], df_cohort_final["no_of_cust_purchases"])
)

# Define a discount rate of 4%

discount_rate = 0.04

# Compute the traditional LTV for each row using 'avg_profit_margin_per_cohort', 'retention_rate_for_cltv' and 'discount_rate'

df_cohort_final["traditional_ltv"] = (
    df_cohort_final["avg_profit_margin_per_cohort"] *
    ((df_cohort_final["retention_rate_for_cltv"] / 100) /
     ((1 + discount_rate) - (df_cohort_final["retention_rate_for_cltv"] / 100)))
)

# Convert the 'traditional_ltv' column to numeric data type and round off to 1 decimal place

df_cohort_final["traditional_ltv"] = pd.to_numeric(df_cohort_final["traditional_ltv"], errors="coerce").round(1)

#Final selection:

df_cohort_final.rename(columns={'retention_rate_%':'retention_rate_pc', 'churn_rate_%':'churn_rate_pc' }, inplace = True)

df_cohort_final["cohort"] = df_cohort_final["cohort"].astype('str', copy=False)

df_cohort_final = df_cohort_final.astype({'record_level_transaction_yr_month': 'str'})

#CLTV Computation - Part 4:

column_names  = ['cohort','record_level_transaction_yr_month' ,'period_number' ,'customer_id','product_type', 'transaction_item_code', 
       'transaction_item_description']

sectors = dataset_1.groupby (column_names)

# Aggregate grouped data based on specified metrics

cust_profile_output = sectors.agg({"transaction_id" : "nunique", 
             "quantity" : "sum",
             "transaction_amount": "sum"})

cust_profile_output .reset_index(inplace = True)

# Merge the output data with another dataframe based on specified columns

output_data= cust_profile_output.merge(df_cohort_final,  on = ['cohort', 'record_level_transaction_yr_month', 'period_number'],how = "left",)

# Calculate the rank of each row within each group based on specified columns

output_data['RN'] = output_data.sort_values(['cohort','record_level_transaction_yr_month','period_number'], ascending=True) \
             .groupby(['cohort','record_level_transaction_yr_month','period_number']) \
             .cumcount() + 1

output_data.rename(columns={'retention_rate_%':'retention_rate', 'churn_rate_%':'churn_rate' }, inplace = True)

# Fill missing values in a specific column with another column's values where RN is 1

output_data.loc[output_data["RN"] == 1, "total_acquired_customers"] = output_data["total_customers"]
output_data["total_acquired_customers"].fillna(0, inplace=True)

output_data.loc[output_data["RN"] == 1, "total_customers"] = output_data["no_of_customers"]
output_data["total_customers"].fillna(0, inplace=True)

output_data.loc[output_data["RN"] == 1, "total_transactions"] = output_data["total_transactions"]
output_data["total_transactions"].fillna(0, inplace=True)

# Replace values in specific columns with 0 where RN is not 1

mask = output_data["RN"] == 1
output_data.loc[~mask, ["no_of_cust_purchases", "retention_rate", "retention_rate_for_cltv", "retention_rate_cohort_avg"]] = 0

mask = output_data["RN"] == 1
output_data.loc[~mask, ["churn_rate", "active_cust", "lost_cust", "revenue", "cumulative_revenue", "avg_revenue_per_user", "avg_profit_margin_per_cohort", "traditional_ltv"]] = 0

Data Visualization:

Let’s try to visualize what we achieved so far. Visualizing cohort-wise CLTV and retention rate is essential in gaining a deeper understanding of customer behavior and the impact of cohorts on the overall CLTV of a business.

By using data visualization techniques, we can quickly identify any patterns or trends that may exist within the data, and make informed decisions about how to optimize our marketing and retention strategies. In this section, I’ll provide step-by-step instructions on how to visualize cohort-wise CLTV and retention rate using Python libraries such as Seaborn and Matplotlib.

Step 11: Visualize Retention Rate:

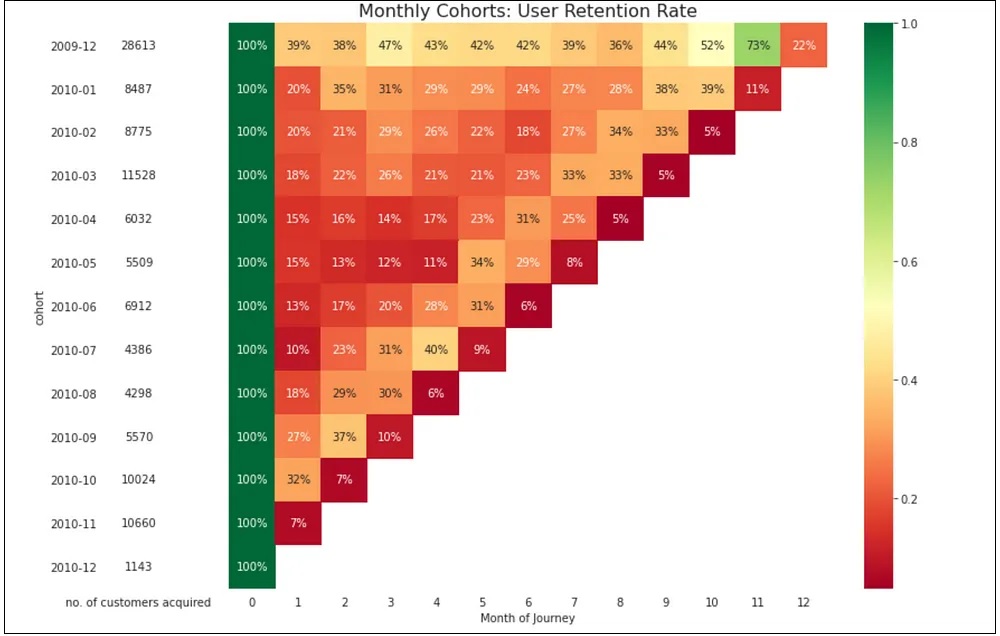
The below-mentioned code creates three pivot tables to show retention rates by cohort and period number which is in turn used to create a heatmap visualization.

#type1: Create a pivot table to show retention rates by cohort and period number.
cohort_pivot_1 = df_cohort_final.pivot_table(index = 'cohort',
                                     columns = 'period_number',
                                     values = 'retention_rate_pc')

#type2: Create a pivot table to show retention rates by period number and cohort.
cohort_pivot_2 = df_cohort_final.pivot_table(index = 'period_number',
                                     columns = 'cohort',
                                     values = 'retention_rate_pc')


#type3: Add a new column to the DataFrame to show retention rates as absolute values. 
df_cohort_final["retention_rate_abs_val"] = df_cohort_final["retention_rate_pc"] /100

cohort_pivot_3 = df_cohort_final.pivot_table(index = 'cohort',
                                     columns = 'period_number',
                                     values = 'retention_rate_abs_val')

cohort_size_values = df_cohort_final.pivot_table(index = 'cohort',
                                     columns = 'period_number',
                                     values = 'no_of_customers')

cohort_size = cohort_size_values.iloc[:,0]

with sns.axes_style("white"):
    fig, ax = plt.subplots(1, 2, figsize=(12, 8), sharey=True, gridspec_kw={'width_ratios': [1, 11]})
    
    # Show retention rates by cohort and period number as a heatmap.
    sns.heatmap(cohort_pivot_3, 
                mask=cohort_pivot_3.isnull(), 
                annot=True, 
                fmt='.0%', 
                cmap='RdYlGn', 
                ax=ax[1])
    ax[1].set_title('Monthly Cohorts: User Retention Rate', fontsize=16)
    ax[1].set(xlabel='Month of Journey',
              ylabel='')

    # Show cohort sizes by cohort and period number as a heatmap.
    cohort_size_df = pd.DataFrame(cohort_size).rename(columns={0: 'no. of customers acquired'})
    white_cmap = mcolors.ListedColormap(['white'])
    sns.heatmap(   cohort_size_df, 
                annot=True, 
                cbar=False, 
                fmt='g', 
                cmap=white_cmap, 
                ax=ax[0])

    fig.tight_layout()
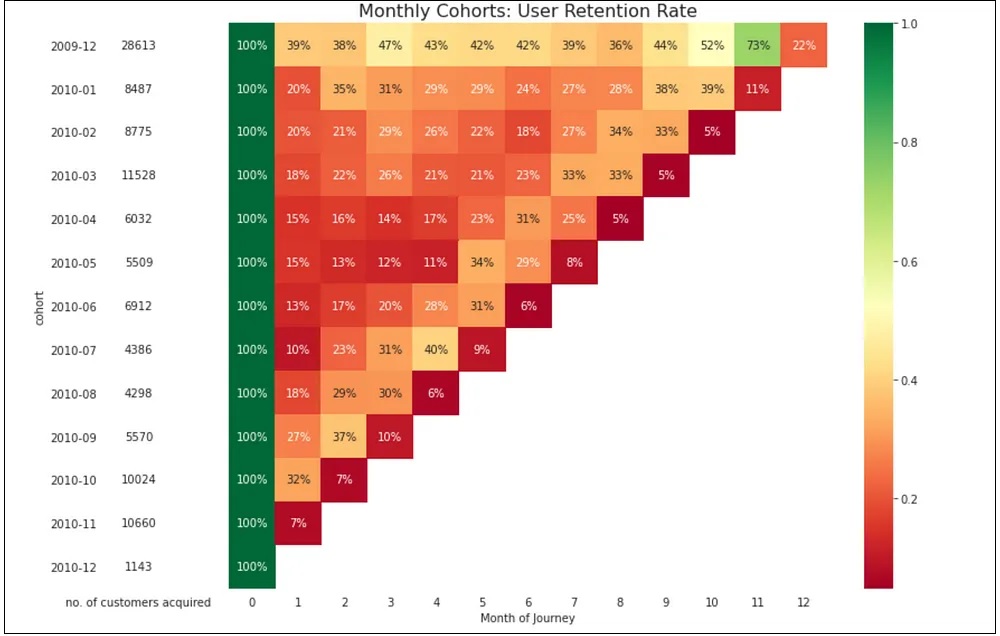
1) Looking at the visualization, we can figure out the cohorts that have been retained well & vice-versa. For example, we could find that customers who made their first purchase in January have the highest retention rate; indicating that customers in this cohort might stick around longer than the ones acquired in other months.

2) The highest retention rate across all cohorts is observed in month 1, with an average of 16.9%. This suggests that the onboarding experience and initial customer engagement may play a critical role in driving long-term retention and loyalty.

3) Looking at the cohort retention rates over time, we can see that the average retention rate across all cohorts stabilizes at around 20-25% after month 3. This shows that customers who remain active beyond the initial few months are more likely to remain engaged with the brand over the long term.

4) While the retention rates for some cohorts drop off very quickly (e.g., customers acquired in October 2010), others exhibit more gradual declines over time. This suggests that different customer segments may have varying needs and preferences when it comes to ongoing engagement and retention strategies.

5) Overall, the retention rates tend to decrease as the months’ progress, indicating that customers are less likely to remain active with the brand as time goes on. This is some useful info that we could pass along to the marketing retention team to help them step up their game.

Additionally, we can also plot the overall retention rate of the organization out of this data cube which would hint at the months when we are losing our customers.

# Compute the average retention rate for each period number

avg_retention_rates = df_cohort_final.groupby('period_number')['retention_rate_pc'].mean().reset_index()

# Set up the figure and axes

fig, ax = plt.subplots(figsize=(12, 8))

# Plot the line chart using seaborn

sns.lineplot(x="period_number", y="retention_rate_pc", data=avg_retention_rates, ax=ax, color='darkred', ci = None)
#plt.fill_between(x="period_number", y1="retention_rate_pc", data=avg_retention_rates, alpha=0.3, color='darkgreen')

# Add annotations to the line chart

for x, y in zip(avg_retention_rates['period_number'], avg_retention_rates['retention_rate_pc']):
    ax.text(x=x, y=y+1.3, s=f"{y:.1f}%", ha='center', va='bottom', color='black')

# Set the title and axis labels

ax.set_title("Overall Retention Rate Over Time")
ax.set_xlabel("Month of Journey")
ax.set_ylabel("Retention Rate (%)")

# Set the x-axis tick locations and labels

ax.set_xticks(avg_retention_rates['period_number'])
ax.set_xticklabels(avg_retention_rates['period_number'], rotation=0, ha='right')

# Display the plot

plt.show()
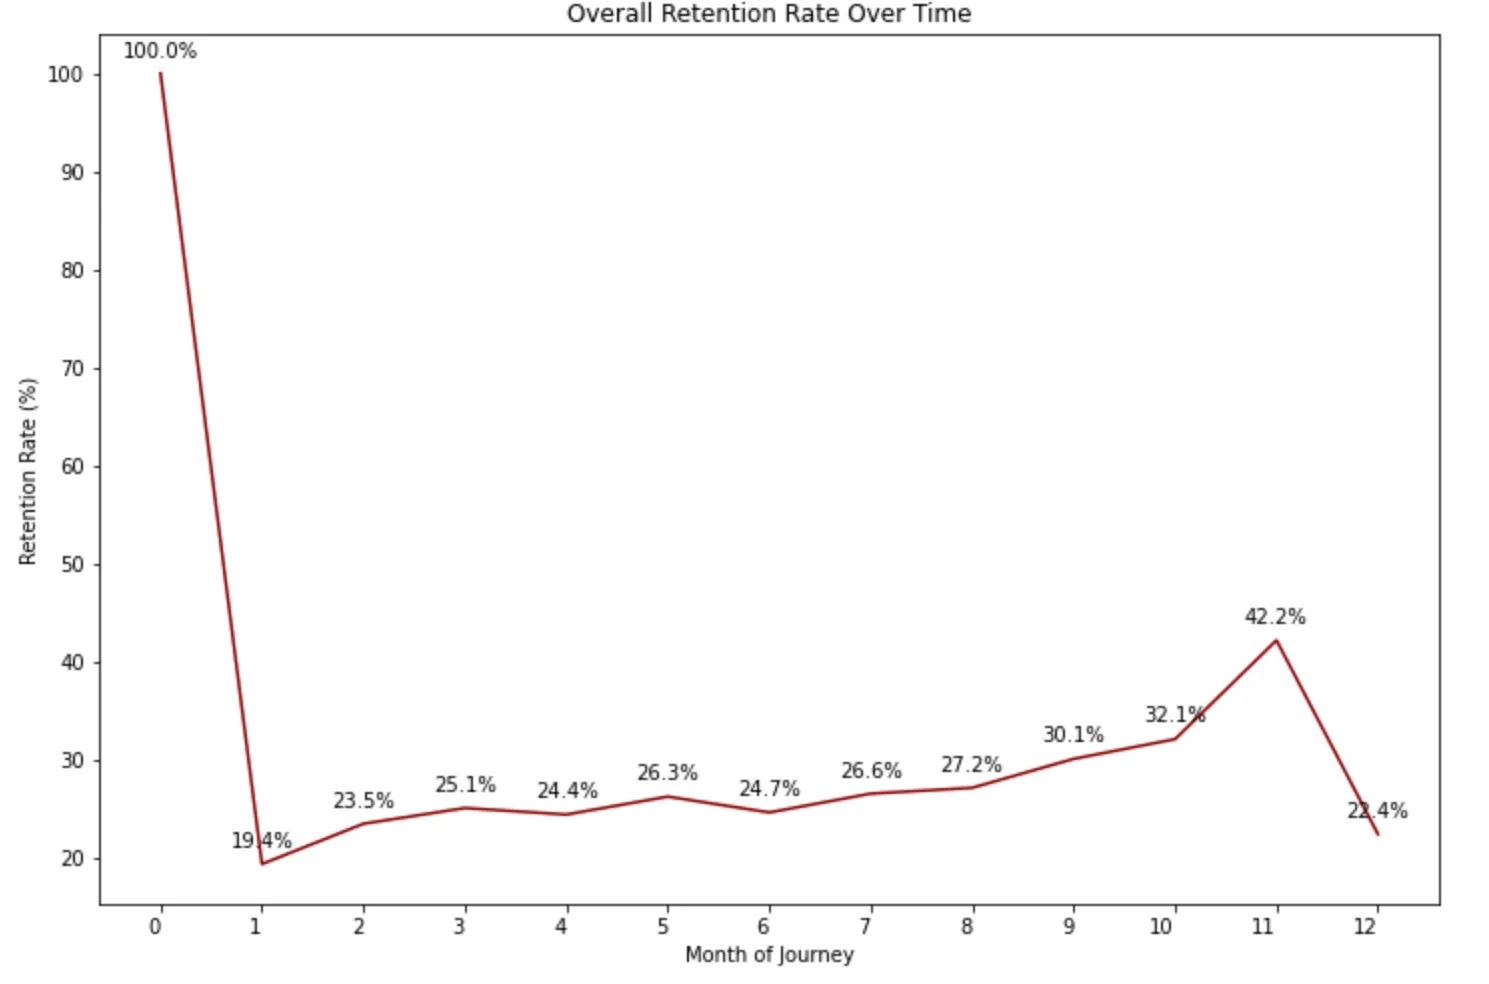
1) Here we can see that the retention rate drops sharply to under 20% in the second month. This suggests that the business may want to focus on improving the customer experience during the first month of its journey to reduce churn.

2) The gradual improvement in retention rate over time shows that efforts to improve customer satisfaction can pay off in the long run.

3) However, the drop in retention rate in the twelfth month suggests that there may be opportunities to retain customers beyond the first year of their journey, and the business could explore strategies to address this issue.

The business could consider offering personalized recommendations or promotions based on past purchases to entice customers to return. Additionally, by slicing and dicing the data further by the most selling categories or subcategories, the business can identify which products are driving customer retention and which ones are causing churn. This can help the business to make informed decisions about product offerings and marketing strategies, which in turn can help to improve customer satisfaction and increase lifetime value.

Step 12: Visualize Customer Life Time Value:

#type1: Create a pivot table to display traditional_ltv by cohort and period number.

cohort_pivot_1 = df_cohort_final.pivot_table(index = 'cohort',
                                     columns = 'period_number',
                                     values = 'traditional_ltv')

#type2: Create a pivot table to display traditional_ltv by period number and cohort.

cohort_pivot_2 = df_cohort_final.pivot_table(index = 'period_number',
                                     columns = 'cohort',
                                     values = 'traditional_ltv')


#type3: Convert traditional_ltv percentages to absolute values.
    
cohort_pivot_3 = df_cohort_final.pivot_table(index = 'cohort',
                                     columns = 'period_number',
                                     values = 'traditional_ltv')

cohort_size_values = df_cohort_final.pivot_table(index = 'cohort',
                                     columns = 'period_number',
                                     values = 'traditional_ltv')

cohort_size = cohort_size_values.iloc[:,0]

with sns.axes_style("white"):
    fig, ax = plt.subplots(1, 2, figsize=(12, 8), sharey=True, gridspec_kw={'width_ratios': [1, 11]})
    
    # Show churn rates by cohort and period number as a heatmap.
    
    sns.heatmap(cohort_pivot_3, 
                mask=cohort_pivot_3.isnull(), 
                annot=True, 
                fmt='', 
                cmap='RdYlGn', 
                ax=ax[1])
    ax[1].set_title('Monthly Cohorts: Customer Lifetime Value', fontsize=16)
    ax[1].set(xlabel='Month of Journey',
              ylabel='')

     # Show cohort sizes by cohort and period number as a heatmap.
     
    cohort_size_df = pd.DataFrame(cohort_size).rename(columns={0: 'No. of customers acquired'})
    white_cmap = mcolors.ListedColormap(['white'])
    sns.heatmap(   cohort_size_df, 
                annot=True, 
                cbar=False, 
                fmt='g', 
                cmap=white_cmap, 
                ax=ax[0])

    fig.tight_layout()
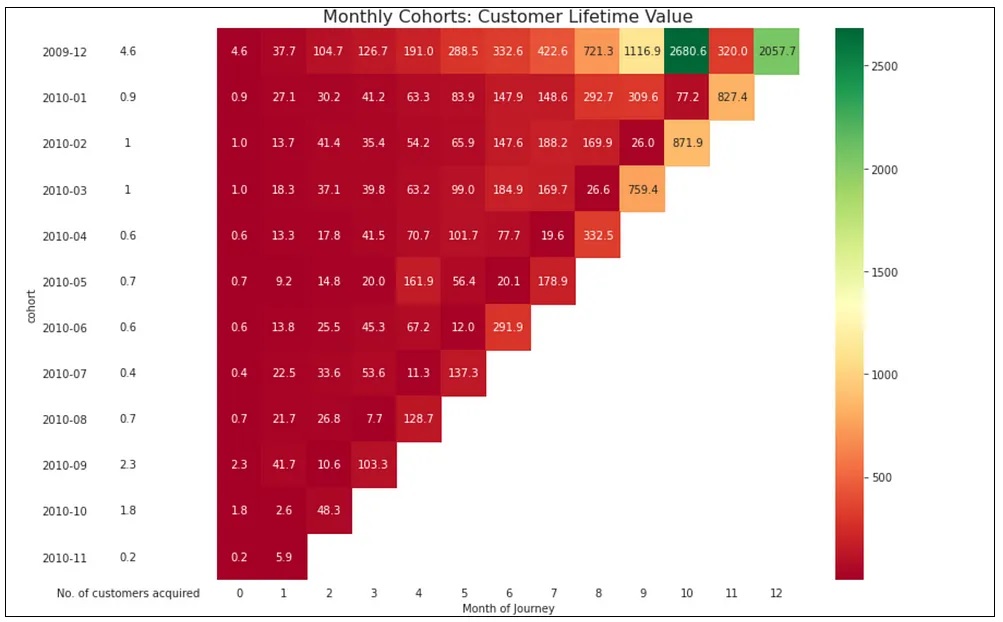
1) High CLTV for the December 2009 cohort: This suggests that the business may want to consider running a targeted marketing campaign to encourage repeat purchases from customers in this cohort. We could also explore opportunities to upsell or cross-sell to these customers to increase their overall lifetime value.

2) Low CLTV for certain cohorts: Customers who were acquired in February, March, April, and May 2010 have low CLTV. This highlights the potential for businesses to provide tailored recommendations and promotions to these customers, taking into account their unique preferences and purchase history.

# Compute the average retention rate for each period number

avg_retention_rates = avg_retention_rates[avg_retention_rates['period_number'] <= 10]

# Set up the figure and axes

fig, ax = plt.subplots(figsize=(12, 8))

# Plot the line chart using seaborn

sns.lineplot(x="period_number", y="traditional_ltv", data=avg_retention_rates, ax=ax, color='darkred', ci = None)
#plt.fill_between(x="period_number", y1="retention_rate_pc", data=avg_retention_rates, alpha=0.3, color='darkgreen')

# Add annotations to the line chart

for x, y in zip(avg_retention_rates['period_number'], avg_retention_rates['traditional_ltv']):
    ax.text(x=x, y=y+3.5, s=f"${y:.1f}", ha='center', va='bottom', color='black')

# Set the title and axis labels

ax.set_title("Overall CLTV Over Time")
ax.set_xlabel("Month of Journey")
ax.set_ylabel("CLTV ($)")

# Set the x-axis tick locations and labels

ax.set_xticks(avg_retention_rates['period_number'])
ax.set_xticklabels(avg_retention_rates['period_number'], rotation=0, ha='right')

# Display the plot

plt.show()
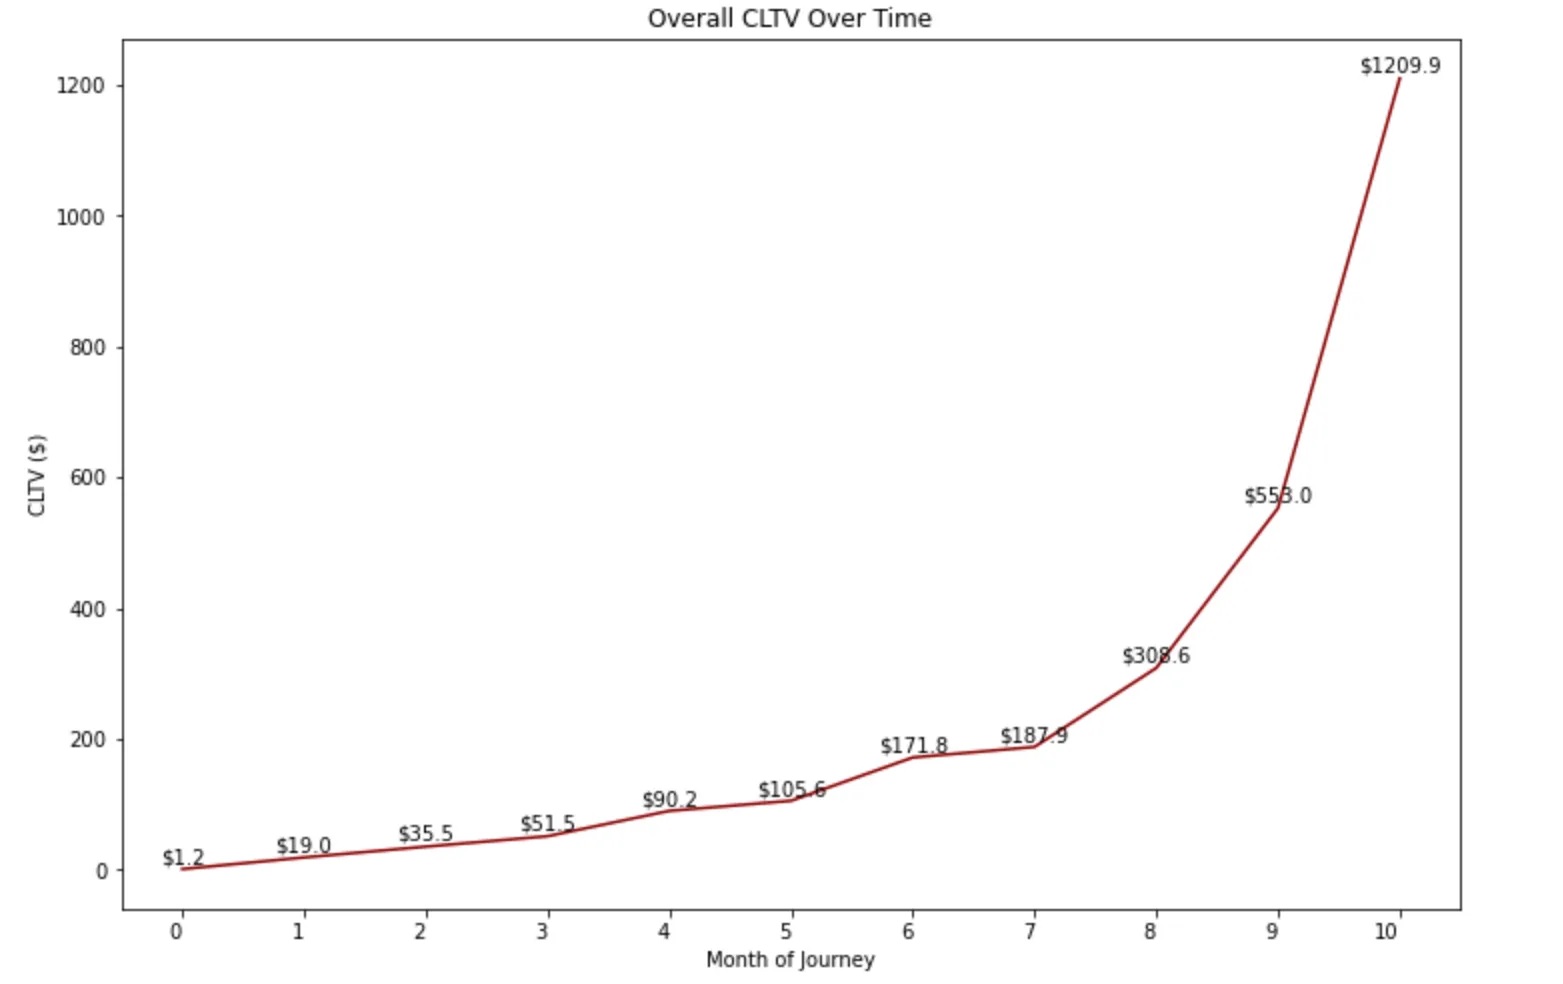
The overall CLTV graph shows us the traditional lifetime value of customers at the organization, starting from the first month when a customer gets onboarded to the organization, and modeling all the way until their 10th month of the customer journey.

Based on the chart provided, it is evident that a profitable acquisition cost for customers who have been with us for 8 months would be around 310. This means that if a customer remains with us for 8 months, they are worth 310. Assuming that the cost of acquiring a new customer in FY2010 was 35, the CAC to LTV ratio would be 6:1, which is considered favorable for a retail business.

Segment customers based on LTV:

In this code snippet, we basically grouped the dataset by cohort, transaction year-month, period number, and customer ID to identify customers in each cohort. Further, we filtered the customer data to only keep customers who have a valid CLTV value.

In the following stages, we performed supervised segmentation in order to group customers based on their CLTV score. Customers whose CLTV score is at or above the 80th percentile were classified as “high_cltv”, while those with a score between the 50th and 80th percentile were classified as “medium_cltv”. Customers with a score below the median were classified as “low_cltv”.

Overall, this code is an important step toward identifying and segmenting customers based on their CLTV values, which can in turn be used to predict future Customer Life Time Value.

#Customers in each cohort

cohort_customers = output_data.groupby(['cohort', 'record_level_transaction_yr_month', 'period_number', 'customer_id']) \
                             .agg(cltv_interim=('traditional_ltv', 'min')) \
                             .reset_index()

cohort_customers = pd.merge(cohort_customers, df_cohort_final, on = ['cohort', 'record_level_transaction_yr_month', 'period_number'], how='left')

cohort_customers["ltv_flag"] = pd.Series(np.where(cohort_customers["traditional_ltv"].notna() ==True,1, 0))

cohort_customers = cohort_customers[cohort_customers["ltv_flag"] == 1]

#Customer Segments by CLTV

customers_ltv = cohort_customers.groupby(['customer_id'])['cohort','period_number', 'traditional_ltv'].max().reset_index()

# Calculate the 80th percentile of traditional_ltv

traditional_ltv_80p = df_cohort_final.traditional_ltv.quantile(0.8)

# Create a new column with "high_cltv" for customers with traditional_ltv >= 80th percentile, and "unknown" for others

customers_ltv["traditional_ltv_segments"] = np.where(customers_ltv["traditional_ltv"] >= traditional_ltv_80p, "high_cltv", "unknown")

# Calculate the 50th and 80th percentile of traditional_ltv

q_low, q_high = customers_ltv["traditional_ltv"].quantile([0.5, 0.8])

# Create a boolean mask for traditional_ltv values between the 50th and 80th percentile

mask = (q_low <= customers_ltv["traditional_ltv"]) & (customers_ltv["traditional_ltv"] < q_high)

# Replace values in the "traditional_ltv_segments" column that meet the mask criteria with "medium_cltv"

customers_ltv["traditional_ltv_segments"] = customers_ltv["traditional_ltv_segments"].mask(mask, "medium_cltv")

# Calculate the median of traditional_ltv from df_cohort_final

traditional_ltv_median = df_cohort_final.traditional_ltv.quantile(0.5)

# Create a boolean mask to identify traditional_ltv values less than the median

traditional_ltv_mask = customers_ltv["traditional_ltv"] < traditional_ltv_median

# Assign "low_cltv" to the traditional_ltv_segments column where the mask is True

customers_ltv.loc[traditional_ltv_mask, "traditional_ltv_segments"] = "low_cltv"

Segment customers based on LTV:

To accurately predict cohort-wise customer lifetime value and Retention Rate, I have utilized various imputation methods including Bayesian, KNN, and random forest. I found that random forest was the most effective method for filling in missing data in the cohort retention matrix for the chosen transactional customer dataset. With this powerful tool, we can confidently predict future CLTV and retention rates in the cohort matrix.

Check out the code below for a demonstration of how we can implement these techniques in Python.

Step 14: Predict Customer Life Time Value:

The first step is to split the data into features (X) and target (y), where X contains the row and column indices and y contains the customer lifetime values.

Then, a random forest regressor is trained on the non-missing values of the data using the scikit-learn RandomForestRegressor class. To evaluate the performance of the random forest regressor, I split the data into a training set and a test set, and calculated metrics such as mean squared error (MSE) and R-squared (R²) on the test set.

Further, I did hyperparameter tuning using the random search technique to search over a range of hyperparameters and to find the best combination of hyperparameters that optimizes a performance metric such as R-squared on a validation set.

The trained model is used to predict the missing values, and the missing values in the original data array are replaced with the predicted values. Finally, the output data is visualized using heatmaps in Seaborn and Matplotlib.

cohort_pivot_3 = df_cohort_final.pivot_table(index = 'cohort',
                                     columns = 'period_number',
                                     values = 'traditional_ltv')

data = cohort_pivot_3.values

# Split the data into features (X) and target (y)
# X contains the row and column indices
# y contains the customer lifetime value

X = np.argwhere(~np.isnan(data))
y = data[~np.isnan(data)]

# Split the data into training and test sets

X_train, X_test, y_train, y_test = train_test_split(X, y, test_size=0.2, random_state=42)

# Define the imputation methods

imputation_methods = {
    'Random Forest': RandomForestRegressor(n_estimators=100, random_state=42),
    'Bayesian': HistGradientBoostingRegressor(random_state=42),
    'KNN': KNeighborsRegressor(n_neighbors=5)
   
}

# Train each imputation method using the training set and evaluate its performance using R-squared score

r2_scores = {}
for name, method in imputation_methods.items():
    # Fit the imputation method on the training set
    method.fit(X_train, y_train)
    # Predict the missing values in the test set
    y_pred = method.predict(X_test)
    # Evaluate the performance using R-squared score
    r2_scores[name] = r2_score(y_test, y_pred)

# Print the R-squared scores for each imputation method

print("R-squared scores:")
for name, score in r2_scores.items():
    print(f"{name}: {score:.2f}")


# Select the imputation method with the best performance

best_method_name = max(r2_scores, key=r2_scores.get)
best_method = imputation_methods[best_method_name]
print(f"\nBest imputation method: {best_method_name}")


# Define the hyperparameter search space

param_distributions = {
    'n_estimators': [100, 200, 300, 400, 500],
    'max_depth': [10, 20, 30, None],
    'min_samples_split': [2, 5, 10],
    'min_samples_leaf': [1, 2, 4],
    'max_features': ['auto', 'sqrt', 'log2']
}

# Train a random forest regressor using random search with cross-validation

rf = RandomForestRegressor()
rs = RandomizedSearchCV(rf, param_distributions, n_iter=100, cv=3, scoring='r2', random_state=42)
rs.fit(X_train, y_train)


# Print the best hyperparameters

print("Best hyperparameters: ", rs.best_params_)

# Predict the missing values in the original data array using the best imputation method

# Replace the missing values in the original data array with the predicted values

predicted_values = best_method.predict(np.argwhere(np.isnan(data)))
data_predicted = data.copy()
data_predicted[np.isnan(data)] = predicted_values

# Convert the data to a DataFrame and add row and column indices

df = pd.DataFrame(data_predicted,index=[ '2009-12', '2010-01', '2010-02', '2010-03', '2010-04', '2010-05', '2010-06','2010-07', '2010-08', '2010-09','2010-10', '2010-11'], columns=['0', '1', '2', '3', '4', '5', '6', '7', '8', '9', '10', '11', '12'])


# Create a heatmap with actual and predicted values distinguished by different colors

sns.set(font_scale=0.8)
fig, ax = plt.subplots(figsize=(12, 8))
sns.heatmap(df, cmap='YlGn', annot=False, fmt=".2f",  cbar=False, ax=ax)
for i in range(df.shape[0]):
    for j in range(df.shape[1]):
        value = df.iloc[i, j]
        if np.isnan(data[i, j]):
            text_color = 'red'
        else:
            text_color = 'black'
        ax.text(j + 0.5, i + 0.5, f'{value:.2f}', ha='center', va='center', color=text_color)
ax.set_title("Cohort Matrix with Heatmap")
ax.set_xlabel("Month of Customer Journey")
ax.set_ylabel("Month when Customer got Acquired")
plt.show() 


What’s Next?

1) Productionize CLTV Model: Run the CLTV model monthly and compare actual vs. predicted results. Create API endpoints and ensure that you feed the current and predicted lifetime values of each customer into your organization’s Customer Data Platform. Collaborate with your marketing automation team to use these customer attributes for targeted web push, SMS push, browser pop-ups, social media ads, and email marketing initiatives.

2) Segment your top-performing customers: Identify your highest customer lifetime value cohort groups and work closely with your marketing communications team to set up upselling and cross-selling marketing campaigns. These campaigns can be run through paid and organic marketing channels and will help you maximize your return on investment.

3) Set up Marketing Retention Campaigns: Identify the customers in the cohorts that have a higher churn rate and initiate retention campaigns. These campaigns can include refer-a-friend gift vouchers, coupon codes, promotions, loyalty programs, and other targeted paid and organic marketing initiatives. Building a long-term relationship with your customers is crucial, so be sure to evaluate the effectiveness of these campaigns by measuring the CLTV and retention rate of those cohorts in subsequent months.

4) Analyze top-selling categories and subcategories: Keep track of which products or services generate the most revenue and identify any CLTV and Retention patterns in customer behavior. Use this information to develop targeted marketing campaigns and optimize your product offerings.

5) Import Customer Acquisition Cost: Overlay customer acquisition cost on top of the CLTV values to benchmark and evaluate the organization’s ongoing marketing campaign initiatives. This will provide valuable insights into the cost-effectiveness of different campaigns and channels.

6) Share Key Findings: Keep your sales and marketing team in the loop by communicating significant insights related to customer retention rate and lifetime value from the cohort analysis and CLTV predictions. Additionally, inform your marketing retention team about any noteworthy patterns that are identified during this journey.

I hope these actions will help you maximize your customer lifetime value and build stronger relationships with your customers. Remember, these are ongoing processes, so continue to refine your strategy and adjust your tactics based on what works best for your business. Good luck.

Conclusion:

In conclusion, predicting customer lifetime value through cohort analysis in Python is an essential skill for any business owner or marketer. Cohort analysis can help you identify customer behavior patterns, while machine learning techniques can be used to predict future customer actions. By applying these techniques, you can optimize your marketing campaigns, improve your profits, and make better decisions about your customers.

I hope this post has helped get you started and encouraged you to explore the world of CLTV modeling. The possibilities are endless, and the results could be game-changing for your business. So, start implementing these techniques and see the positive impact on your business growth. Thank you for reading!

GitHub Repository

I have learned (and continue to learn) from many folks in Github. Hence sharing my entire python script and supporting files in a public GitHub Repository in case if it benefits any seekers online. Also, feel free to reach out to me if you need any help in understanding the fundamentals of supervised machine learning algorithms in Python. Happy to share what I know:) Hope this helps!

"> Introduction

As a business owner or marketer, understanding our customers’ lifetime value is crucial to maximizing our profits and improving the overall marketing strategy. In this blog post, let’s go through the process of predicting customer lifetime value using cohort analysis in Python.

Cohort analysis is a powerful technique that helps businesses identify groups of customers with similar characteristics and behaviors. By grouping customers into cohorts, we can better understand how their behavior changes over time and predict their future actions. Using Python, I’ll show you how to calculate key metrics such as retention rates and lifetime values for each cohort.

But simply calculating these metrics is not enough - we also need to use machine learning techniques to predict future customer behavior. In this post, I’ll show you how to use a popular ensemble learning method called random forest to predict future customer lifetime value based on past behavior.

Even if you’re new to Python or machine learning, this post will provide you with a step-by-step guide on how to use these powerful techniques to make better decisions about your customers. Whether you’re a marketer looking to optimize your campaigns or a business owner looking to improve your profits, understanding customer lifetime value is critical to success. So let’s get started!

Understanding Cohort Analysis:

Cohort analysis is a powerful tool that can help businesses make data-driven decisions and optimize their customer engagement and retention strategies. By grouping customers based on shared characteristics and analyzing their behavior over time, businesses can gain valuable insights into customer behavior and make informed decisions about how to grow and succeed in a competitive marketplace.

One common way to perform cohort analysis is to group customers by the month in which they made their first purchase. This allows us to compare how different cohorts of customers behave over time, and identify patterns and trends in customer behavior.

For example, let’s say we have an online clothing store. We can group our customers into cohorts based on the month they made their first purchase and track how much they spend over time. By comparing different cohorts, we might find that customers who made their first purchase in December tend to spend more overall than customers who made their first purchase in January.

Another important metric we can calculate using cohort analysis is the retention rate. The retention rate measures the percentage of customers who make a repeat purchase after their initial purchase. By tracking retention rates for different cohorts, we can see how customer loyalty and engagement change over time.

Using cohort analysis, we can also calculate customer lifetime value (CLTV), which is a measure of how much revenue a customer is expected to generate over their lifetime. Understanding CLTV for different customer cohorts can help us make strategic decisions about marketing, customer acquisition, and product development.

Lastly, by combining cohort analysis with machine learning, businesses can gain a deeper understanding of their customers and make more accurate predictions about their future behavior.

How do we compute Customer LifeTime Value:

While there is no one-size-fits-all solution for predicting customer lifetime value, the traditional CLTV model is a proven method that has been used successfully by businesses for decades. The calculation is quite effective because it takes into account the Customer Retention Rate, Profit Margin, Discount Rates, and the average number of transactions over the life span of the customers.

1) Avg. Profit Margin Per Customer Life Span = The average profit we make on each customer over the span of their lifetime. It is essentially the product of the following: Average Revenue per customer * yearly profit margin * avg. no. of purchases per customer life span * customer life span

2) Customer Retention Rate = The number of cycles that we expect the customer to keep purchasing from us.

3) Discount Rate = This is the interest rate applied in discounted cash flow analysis to learn the current value of future cash flows.

In the next section, let’s go through a step-by-step guide to perform cohort analysis in Python and use it to predict customer lifetime value.

Data Preparation:

Importing and Preprocessing the Data: We will be using a publicly available transactional customer dataset from an online retail store in the UK. The dataset is available in the GitHub Repository that we will be using for this tutorial. Before we begin analyzing the data, we need to perform some preprocessing steps to ensure that the data is in a format that can be easily analyzed.

In this section, I’ll share the Python code that we used to clean and prepare the data for the predictive analytics of Retention Rate and Customer Life Time Value (CLTV). I’ll also provide comments to explain the code and summarize the key steps to make it easy to follow along. So let’s dive in!

Step 0:Restart the session and clear all temporary variables:

try:
    from IPython import get_ipython
    get_ipython().magic('clear')
    get_ipython().magic('reset -f')
except:
    pass

Step 1:Import relevant libraries:

Import all the relevant Python libraries for building supervised machine learning algorithms.

#Standard libraries for data analysis:

import numpy as np
import matplotlib.pyplot as plt
import pandas as pd
from scipy.stats import norm, skew
from scipy import stats
import statsmodels.api as sm

# sklearn modules for data preprocessing:

from sklearn.impute import SimpleImputer
from sklearn.preprocessing import LabelEncoder, OneHotEncoder
from sklearn.compose import ColumnTransformer
from sklearn.preprocessing import OneHotEncoder
from sklearn.preprocessing import StandardScaler

#sklearn modules for Model Selection:

from sklearn.ensemble import RandomForestRegressor
from sklearn.neighbors import KNeighborsRegressor
from sklearn.experimental import enable_hist_gradient_boosting  # Required to enable HGBR
from sklearn.ensemble import HistGradientBoostingRegressor


#sklearn modules for Model Evaluation & Improvement:

from sklearn.model_selection import train_test_split
from sklearn.metrics import r2_score
from sklearn.model_selection import train_test_split, RandomizedSearchCV

#Standard libraries for data visualization:

import seaborn as sns
from matplotlib import pyplot
import matplotlib.pyplot as plt
import matplotlib.pylab as pylab
import matplotlib.colors as mcolors
import matplotlib 
%matplotlib inline
color = sn.color_palette()
import matplotlib.ticker as mtick
from IPython.display import display
pd.options.display.max_columns = None
from pandas.plotting import scatter_matrix
from sklearn.metrics import roc_curve

#Miscellaneous Utilitiy Libraries:

import random
import os
import re
import sys
import timeit
import string
import time
import warnings
from datetime import datetime
from time import time
from operator import attrgetter
from dateutil.parser import parse
import joblib

Step 2:Set up the current working directory:

os.chdir(r"C:/Users/srees/Propensity Scoring Models/Predict Customer lifetime value/")

Step 3:Import the dataset:

Let’s load the input dataset into the Python notebook in the current working directory.

1) dtype is defined for the customer_id and transaction_id columns.

2) parse_dates is defined for the transaction_date column.

dataset = pd.read_excel('online_retail_monthly.xlsx',
                   dtype={'customer_id': str,
                          'transaction_id': str},
                   parse_dates=['transaction_date'])


df = dataset

The imported dataset is stored in the df variable.

Step 4:Evaluate the data structure:

df.head()

df.columns

df.describe()

The output of the describe() method provides a quick summary of the key statistical measures of the numerical columns in our dataset. It can help us to get a general understanding of our dataset and detect any outliers, missing values, or potential data quality issues. In our case, it shows the summary statistics of the “quantity”, “price”, and “transaction_amount” columns.

From the output, we can observe that the average “quantity” is around 12, the average “price” is around 3, and the average “transaction_amount” is around 20. The standard deviation (std) of these variables is quite high, indicating that they are dispersed across a wide range of values. Additionally, the minimum and maximum values of each variable indicate the range of values they can take. The median or the 50th percentile (50%) of the variables is closer to the 25th percentile (25%) than the 75th percentile (75%), which suggests that the distribution of these variables might be skewed to the right.

Ensure column data types and identify missing values:

It is crucial to constantly monitor missing values within a dataset, as they can adversely affect model construction and accuracy.

df.columns.to_series().groupby(df.dtypes).groups

df.isna().any()

The output of the code snippet “df.isna().any()” shows which columns in our dataset contain missing values (NaN). In our case, three columns have missing values: “transaction_item_description”, “customer_id”, and “first_transaction_month”.

It’s important to handle missing values before performing any analysis on the data as they can lead to biased or inaccurate results. We can either remove the rows with missing values or impute the missing values with appropriate methods depending on the context and nature of the missing data.

Step 5: Clean the dataset:

df = df.dropna(subset=["transaction_id", "customer_id", "transaction_date", "first_transaction_month"])

This will drop all rows that have missing values in any of the specified columns (i.e., “transaction_id”, “customer_id”, “transaction_date”, and “first_transaction_month”) and return a new DataFrame.

# Replace NA's in "transaction_amount" with 0
df["transaction_amount"].fillna(0, inplace=True)

# Filter data & select only monthly FMCG transactions in UK
df = df[(df["frequency_of_payment"] == "monthly") & 
        (df["product_type"] == "fast_moving_consumer_goods") & 
        (df["country"] == "United Kingdom")]

#Filter out all the returns
df = df.query('quantity > 0')

Cohort Analysis:

To perform cohort analysis, businesses typically follow a few key steps. First, they identify the cohort groups they want to analyze, such as customers who made their first purchase in a given month. Then, they calculate retention rates for each cohort group over time, which shows how many customers from each group remain active over time. And then they compute Customer Lifetime Value.

In the following sections, I’ll walk you through the steps to prepare the data for analysis and generate valuable insights.

Step 6: Retention Rate:

In the code snippet provided, we first converted the “first_transaction_month” and “transaction_date” columns into datetime format and grouped customers by their first transaction month. We then computed the retention rate for each cohort by finding the percentage of customers who remained active in each subsequent period.

Finally, we calculated the churn rate as the complement of the retention rate, or the percentage of customers who did not remain active. This information can be extremely useful in understanding customer behavior over time and optimizing marketing and engagement efforts.

# Convert the 'first_transaction_month' column into a monthly period

df['first_transaction_month'] = pd.to_datetime(df['first_transaction_month'], format='%Y-%m-%d').dt.to_period('M')

# Convert the 'transaction_date' column into a monthly period

df["record_level_transaction_month"] = df["transaction_date"].dt.to_period('M')

# Rename the 'first_transaction_month' column as 'cohort'

df.rename(columns={'first_transaction_month': 'cohort'}, inplace=True)

# Calculate the number of unique customers per cohort and 'record level transaction month'

df_cohort_1 = (df
    .groupby(["cohort", "record_level_transaction_month"])
    .agg(no_of_customers=("customer_id", "count"))
    .reset_index()
)

# Compute the difference in months/periods between 'cohort' and 'record_level_transaction_month'

df_cohort_1['period_number'] = df_cohort_1.apply(lambda row: (row['record_level_transaction_month'] - row['cohort']).n, axis=1)

# Calculate the total number of customers in the cohort and the retention rate for each period

mask1 = df_cohort_1['period_number'] == 0
interim_tbl = df_cohort_1.loc[mask1, ['cohort', 'no_of_customers']].rename(columns={'no_of_customers': 'total_customers'})
df_cohort_1 = df_cohort_1.merge(interim_tbl, on='cohort', how='left')
df_cohort_1['retention_rate_%'] = (100 * df_cohort_1['no_of_customers'] / df_cohort_1['total_customers']).round(2)

# Calculate the churn rate as the complement of the retention rate, and handle zero churn rates

df_cohort_1["churn_rate_%"] = (100 - df_cohort_1["retention_rate_%"]).round(2)
df_cohort_1.loc[df_cohort_1["churn_rate_%"] == 0.00, "churn_rate_%"] = 100

Step 7: Active & Lost Customers:

Once the cohort analysis has been performed, we can use the resulting cohort groups to identify active and lost customers over time. This can be done by calculating the number of customers who remain active in each cohort group over time, as well as the number of customers who become inactive. Finally, we merged this information back into the original cohort analysis DataFrame and rearranged the columns for readability.

By identifying active and lost customers over time, businesses can gain valuable insights into how customer behavior changes over time, and develop more accurate and effective strategies for retaining customers and maximizing customer lifetime value. This can lead to increased customer loyalty, higher revenues, and greater long-term success for the business.

# Assign the number of active customers in each passing year of a cohort to the "active_cust" column

df_cohort_1 = df_cohort_1.assign(active_cust=df_cohort_1["no_of_customers"])

# Compute the lost customers for each cohort and period by taking the difference between the current and previous period's "active_cust" values

lost_customers = (
    df_cohort_1
    .groupby(['cohort', 'record_level_transaction_month', 'period_number'])['active_cust']
    .sum()
    .groupby(level=0)
    .diff()
    .abs()
    .reset_index(name='lost_cust')
)

# Merge the "lost_customers" data back into the original "df_cohort_1" DataFrame

df_cohort_1 = df_cohort_1.merge(lost_customers, on=['cohort', 'record_level_transaction_month', 'period_number'], how='left')

# Replace any missing "lost_cust" values with the corresponding "active_cust" values

df_cohort_1['lost_cust'].fillna(df_cohort_1['active_cust'], inplace=True)

#Rearrange the column positions:

select = ['cohort', 'record_level_transaction_month', 'period_number', 'no_of_customers', 'retention_rate_%', 'churn_rate_%', 'active_cust', 'lost_cust']
df_cohort_1 = df_cohort_1.loc[:, select]


Step 8: Cumulative Revenue:

In the code below, we have computed cumulative revenue for each cohort and period. This allows us to see how much revenue each cohort generates over time, and how it compares to other cohorts.

# Aggregate revenue data by cohort and record level transaction month
  
df_cohort_2 = (
    df.groupby(["cohort", "record_level_transaction_month"])
    ["transaction_amount"]
    .sum()
    .reset_index(name="revenue")
)

# Calculate the time difference in months between cohort and transaction month
         
df_cohort_2['period_number'] = (df_cohort_2.record_level_transaction_month - df_cohort_2.cohort).apply(attrgetter('n'))

# Compute cumulative revenue for each cohort and period

cumulative_revenue = (df_cohort_2
                     .groupby(['cohort', 'record_level_transaction_month', 'period_number'])['revenue']
                     .sum()
                     .groupby(level=0)
                     .cumsum()
                     .rename('cumulative_revenue')
                     .reset_index())

# Merge cumulative revenue data into the original cohort analysis

df_cohort_2 = df_cohort_2.merge(cumulative_revenue, on=['cohort', 'record_level_transaction_month', 'period_number'], how='left')

# Rearrange columns for readability

df_cohort_2 = df_cohort_2[['cohort', 'record_level_transaction_month', 'period_number', 'revenue', 'cumulative_revenue']]

Step 9: Average Revenue per User (ARPU):

# Merge two cohort dataframes on specific columns

df_cohort_final = pd.merge(df_cohort_1, df_cohort_2, on=['cohort', 'record_level_transaction_month', 'period_number'], how='left')

# Calculate average revenue per user for each cohort and time period

df_cohort_final["avg_revenue_per_user"] = df_cohort_final["cumulative_revenue"] / df_cohort_final["no_of_customers"]

# Round the average revenue per user to 2 decimal places

df_cohort_final["avg_revenue_per_user"] = df_cohort_final["avg_revenue_per_user"].round(2)

Step 10: Customer Life Time Value (CLTV):

In this code, we prepared our transactional customer dataset to compute the customer lifetime value. After cleaning the data, we grouped the transactions by customer ID to get the first transaction date of each customer. And then we calculated the number of periods between the transaction date & cohort date to identify the months of customer journey.

# CLTV Computation - Part 1:

# Create a copy of the original dataset to avoid modifying it directly

dataset_1 = dataset.copy()

# Remove transactions with missing transaction dates

dataset_1 = dataset_1[pd.notnull(dataset_1["transaction_date"])]

# Convert transaction_date column to datetime data type

dataset_1['transaction_date'] = dataset_1['transaction_date'].astype('datetime64')

# Group transactions by customer ID and get the first transaction date for each customer

first_transaction_date = dataset_1.groupby('customer_id')['transaction_date'].agg('min')

# Merge the first_transaction_date column into the original dataset

dataset_1 = dataset_1.merge(first_transaction_date, how='left', on='customer_id', suffixes=('', '_first'))

# Rename the new column to first_transaction_date

dataset_1.rename(columns={'transaction_date_first': 'first_transaction_date'}, inplace=True)

# Remove rows with missing first_transaction_date values

dataset_1.dropna(subset=['first_transaction_date'], inplace=True)

#Convert date columns to datetime format and then back to string format

date_cols = ["transaction_date", "first_transaction_date"]
dataset_1[date_cols] = dataset_1[date_cols].apply(pd.to_datetime, format='%Y-%m-%d').astype(str)

# Converts the "transaction_date" and "first_transaction_date" columns in "dataset_1" from strings to datetime objects 
#using the "apply()" method and assigns the results back to the same columns.

dataset_1[["transaction_date", "first_transaction_date"]] = dataset_1[["transaction_date", "first_transaction_date"]].apply(pd.to_datetime)

# Adds two new columns to dataset_1 with the year of each transaction.

dataset_1 = dataset_1.assign(first_transaction_yr=dataset_1['first_transaction_date'].dt.to_period('Y'),
                             record_level_transaction_yr=dataset_1['transaction_date'].dt.to_period('Y'))

# Convert date columns into year-month period format and assign to new columns

dataset_1[['first_transaction_yr_month', 'record_level_transaction_yr_month']] = dataset_1[['first_transaction_date', 'transaction_date']].apply(lambda x: x.dt.to_period('M'))

dataset_1.rename(columns={'first_transaction_yr_month':'cohort'}, inplace = True)

# Calculate the number of periods between transaction date and cohort date

dataset_1['period_number'] = (dataset_1.record_level_transaction_yr_month - dataset_1.cohort).apply(attrgetter('n'))

dataset_1.query("cohort >= '2009-12'", inplace=True)

# Filter dataset_1 to include only records from past cohorts and exclude current month

today_str = datetime.today().strftime('%Y-%m')
dataset_1 = dataset_1[(dataset_1["cohort"] < today_str) & (dataset_1["record_level_transaction_yr_month"] != today_str)] 


The following segment of the code involved grouping our data by a specific set of columns, such as cohort and transaction month, and then figuring out the number of unique transactions and the number of purchases per customer.

#CLTV Computation - Part 2: 

df_cohort_final.rename(columns={'record_level_transaction_month':'record_level_transaction_yr_month'}, inplace = True)

# Defining the column names for grouping the dataset

column_names  = ['cohort','record_level_transaction_yr_month' ,'period_number' ]

# Grouping the dataset by specified column names

sector = dataset_1.groupby (column_names)

# Aggregating transaction_id and customer_id columns by counting unique values

df_cohort_3 = sector.agg({"transaction_id" : "nunique", 
             "customer_id" : "nunique"})

# Calculating the number of purchases per customer

df_cohort_3["no_of_cust_purchases"] =  df_cohort_3["transaction_id"] / df_cohort_3["customer_id"]

df_cohort_3["no_of_cust_purchases"]  = round(df_cohort_3["no_of_cust_purchases"], 1)

# Merging df_cohort_final with df_cohort_3 on specified columns

df_cohort_final = pd.merge(df_cohort_final,df_cohort_3, on=['cohort','record_level_transaction_yr_month' ,'period_number'], how='left') 

df_cohort_final = df_cohort_final.rename(columns={'transaction_id':'total_transactions', 'customer_id':'total_customers'})

# Adding a new column period_number_for_cltv which is period_number+1

df_cohort_final["period_number_for_cltv"] = df_cohort_final["period_number"] +1

# Calculating the retention rate for each cohort by grouping and shifting the retention_rate_% column

df_cohort_final["retention_rate_for_cltv"] = df_cohort_final.groupby(["cohort"])["retention_rate_%"].shift(-1)

In this part of the code, we grouped the data by ‘cohort’ to calculate the average retention rate for each cohort. This average retention rate is then merged back into the original data frame, and used to calculate the average profit margin for each cohort. Finally, a traditional customer lifetime value (LTV) is computed for each row using the average profit margin, retention rate, and discount rate. As I mentioned earlier, the traditional LTV is nothing but a metric that helps us to determine how much we can spend on acquiring & retaining customers while generating profit.

#CLTV Computation - Part 3:

column_names  = ['cohort']

# Group the dataframe 'df_cohort_final' by the column 'cohort'

sector = df_cohort_final.groupby (column_names)

# Compute the mean of the 'retention_rate_for_cltv' column for each group 

interim_tbl2 = sector.agg({"retention_rate_for_cltv" : "mean"})

interim_tbl2.rename(columns={'retention_rate_for_cltv':'retention_rate_cohort_avg'}, inplace = True)

# Merge the 'interim_tbl2' dataframe with 'df_cohort_final' on the 'cohort' column

df_cohort_final = pd.merge(df_cohort_final,interim_tbl2, on=['cohort'], how='left')

df_cohort_final["retention_rate_cohort_avg"] = pd.to_numeric(df_cohort_final["retention_rate_cohort_avg"], errors="coerce").round(1)

df_cohort_final["retention_rate_for_cltv"].fillna(df_cohort_final["retention_rate_cohort_avg"], inplace=True)

# Compute 'avg_profit_margin_per_cohort' column by multiplying different columns of 'df_cohort_final'

df_cohort_final["avg_profit_margin_per_cohort"] = np.multiply(
    np.multiply(df_cohort_final["avg_revenue_per_user"], 0.2),
    np.multiply(df_cohort_final["period_number_for_cltv"], df_cohort_final["no_of_cust_purchases"])
)

# Define a discount rate of 4%

discount_rate = 0.04

# Compute the traditional LTV for each row using 'avg_profit_margin_per_cohort', 'retention_rate_for_cltv' and 'discount_rate'

df_cohort_final["traditional_ltv"] = (
    df_cohort_final["avg_profit_margin_per_cohort"] *
    ((df_cohort_final["retention_rate_for_cltv"] / 100) /
     ((1 + discount_rate) - (df_cohort_final["retention_rate_for_cltv"] / 100)))
)

# Convert the 'traditional_ltv' column to numeric data type and round off to 1 decimal place

df_cohort_final["traditional_ltv"] = pd.to_numeric(df_cohort_final["traditional_ltv"], errors="coerce").round(1)

#Final selection:

df_cohort_final.rename(columns={'retention_rate_%':'retention_rate_pc', 'churn_rate_%':'churn_rate_pc' }, inplace = True)

df_cohort_final["cohort"] = df_cohort_final["cohort"].astype('str', copy=False)

df_cohort_final = df_cohort_final.astype({'record_level_transaction_yr_month': 'str'})

#CLTV Computation - Part 4:

column_names  = ['cohort','record_level_transaction_yr_month' ,'period_number' ,'customer_id','product_type', 'transaction_item_code', 
       'transaction_item_description']

sectors = dataset_1.groupby (column_names)

# Aggregate grouped data based on specified metrics

cust_profile_output = sectors.agg({"transaction_id" : "nunique", 
             "quantity" : "sum",
             "transaction_amount": "sum"})

cust_profile_output .reset_index(inplace = True)

# Merge the output data with another dataframe based on specified columns

output_data= cust_profile_output.merge(df_cohort_final,  on = ['cohort', 'record_level_transaction_yr_month', 'period_number'],how = "left",)

# Calculate the rank of each row within each group based on specified columns

output_data['RN'] = output_data.sort_values(['cohort','record_level_transaction_yr_month','period_number'], ascending=True) \
             .groupby(['cohort','record_level_transaction_yr_month','period_number']) \
             .cumcount() + 1

output_data.rename(columns={'retention_rate_%':'retention_rate', 'churn_rate_%':'churn_rate' }, inplace = True)

# Fill missing values in a specific column with another column's values where RN is 1

output_data.loc[output_data["RN"] == 1, "total_acquired_customers"] = output_data["total_customers"]
output_data["total_acquired_customers"].fillna(0, inplace=True)

output_data.loc[output_data["RN"] == 1, "total_customers"] = output_data["no_of_customers"]
output_data["total_customers"].fillna(0, inplace=True)

output_data.loc[output_data["RN"] == 1, "total_transactions"] = output_data["total_transactions"]
output_data["total_transactions"].fillna(0, inplace=True)

# Replace values in specific columns with 0 where RN is not 1

mask = output_data["RN"] == 1
output_data.loc[~mask, ["no_of_cust_purchases", "retention_rate", "retention_rate_for_cltv", "retention_rate_cohort_avg"]] = 0

mask = output_data["RN"] == 1
output_data.loc[~mask, ["churn_rate", "active_cust", "lost_cust", "revenue", "cumulative_revenue", "avg_revenue_per_user", "avg_profit_margin_per_cohort", "traditional_ltv"]] = 0

Data Visualization:

Let’s try to visualize what we achieved so far. Visualizing cohort-wise CLTV and retention rate is essential in gaining a deeper understanding of customer behavior and the impact of cohorts on the overall CLTV of a business.

By using data visualization techniques, we can quickly identify any patterns or trends that may exist within the data, and make informed decisions about how to optimize our marketing and retention strategies. In this section, I’ll provide step-by-step instructions on how to visualize cohort-wise CLTV and retention rate using Python libraries such as Seaborn and Matplotlib.

Step 11: Visualize Retention Rate:

The below-mentioned code creates three pivot tables to show retention rates by cohort and period number which is in turn used to create a heatmap visualization.

#type1: Create a pivot table to show retention rates by cohort and period number.
cohort_pivot_1 = df_cohort_final.pivot_table(index = 'cohort',
                                     columns = 'period_number',
                                     values = 'retention_rate_pc')

#type2: Create a pivot table to show retention rates by period number and cohort.
cohort_pivot_2 = df_cohort_final.pivot_table(index = 'period_number',
                                     columns = 'cohort',
                                     values = 'retention_rate_pc')


#type3: Add a new column to the DataFrame to show retention rates as absolute values. 
df_cohort_final["retention_rate_abs_val"] = df_cohort_final["retention_rate_pc"] /100

cohort_pivot_3 = df_cohort_final.pivot_table(index = 'cohort',
                                     columns = 'period_number',
                                     values = 'retention_rate_abs_val')

cohort_size_values = df_cohort_final.pivot_table(index = 'cohort',
                                     columns = 'period_number',
                                     values = 'no_of_customers')

cohort_size = cohort_size_values.iloc[:,0]

with sns.axes_style("white"):
    fig, ax = plt.subplots(1, 2, figsize=(12, 8), sharey=True, gridspec_kw={'width_ratios': [1, 11]})
    
    # Show retention rates by cohort and period number as a heatmap.
    sns.heatmap(cohort_pivot_3, 
                mask=cohort_pivot_3.isnull(), 
                annot=True, 
                fmt='.0%', 
                cmap='RdYlGn', 
                ax=ax[1])
    ax[1].set_title('Monthly Cohorts: User Retention Rate', fontsize=16)
    ax[1].set(xlabel='Month of Journey',
              ylabel='')

    # Show cohort sizes by cohort and period number as a heatmap.
    cohort_size_df = pd.DataFrame(cohort_size).rename(columns={0: 'no. of customers acquired'})
    white_cmap = mcolors.ListedColormap(['white'])
    sns.heatmap(   cohort_size_df, 
                annot=True, 
                cbar=False, 
                fmt='g', 
                cmap=white_cmap, 
                ax=ax[0])

    fig.tight_layout()

1) Looking at the visualization, we can figure out the cohorts that have been retained well & vice-versa. For example, we could find that customers who made their first purchase in January have the highest retention rate; indicating that customers in this cohort might stick around longer than the ones acquired in other months.

2) The highest retention rate across all cohorts is observed in month 1, with an average of 16.9%. This suggests that the onboarding experience and initial customer engagement may play a critical role in driving long-term retention and loyalty.

3) Looking at the cohort retention rates over time, we can see that the average retention rate across all cohorts stabilizes at around 20-25% after month 3. This shows that customers who remain active beyond the initial few months are more likely to remain engaged with the brand over the long term.

4) While the retention rates for some cohorts drop off very quickly (e.g., customers acquired in October 2010), others exhibit more gradual declines over time. This suggests that different customer segments may have varying needs and preferences when it comes to ongoing engagement and retention strategies.

5) Overall, the retention rates tend to decrease as the months’ progress, indicating that customers are less likely to remain active with the brand as time goes on. This is some useful info that we could pass along to the marketing retention team to help them step up their game.

Additionally, we can also plot the overall retention rate of the organization out of this data cube which would hint at the months when we are losing our customers.

# Compute the average retention rate for each period number

avg_retention_rates = df_cohort_final.groupby('period_number')['retention_rate_pc'].mean().reset_index()

# Set up the figure and axes

fig, ax = plt.subplots(figsize=(12, 8))

# Plot the line chart using seaborn

sns.lineplot(x="period_number", y="retention_rate_pc", data=avg_retention_rates, ax=ax, color='darkred', ci = None)
#plt.fill_between(x="period_number", y1="retention_rate_pc", data=avg_retention_rates, alpha=0.3, color='darkgreen')

# Add annotations to the line chart

for x, y in zip(avg_retention_rates['period_number'], avg_retention_rates['retention_rate_pc']):
    ax.text(x=x, y=y+1.3, s=f"{y:.1f}%", ha='center', va='bottom', color='black')

# Set the title and axis labels

ax.set_title("Overall Retention Rate Over Time")
ax.set_xlabel("Month of Journey")
ax.set_ylabel("Retention Rate (%)")

# Set the x-axis tick locations and labels

ax.set_xticks(avg_retention_rates['period_number'])
ax.set_xticklabels(avg_retention_rates['period_number'], rotation=0, ha='right')

# Display the plot

plt.show()

1) Here we can see that the retention rate drops sharply to under 20% in the second month. This suggests that the business may want to focus on improving the customer experience during the first month of its journey to reduce churn.

2) The gradual improvement in retention rate over time shows that efforts to improve customer satisfaction can pay off in the long run.

3) However, the drop in retention rate in the twelfth month suggests that there may be opportunities to retain customers beyond the first year of their journey, and the business could explore strategies to address this issue.

The business could consider offering personalized recommendations or promotions based on past purchases to entice customers to return. Additionally, by slicing and dicing the data further by the most selling categories or subcategories, the business can identify which products are driving customer retention and which ones are causing churn. This can help the business to make informed decisions about product offerings and marketing strategies, which in turn can help to improve customer satisfaction and increase lifetime value.

Step 12: Visualize Customer Life Time Value:

#type1: Create a pivot table to display traditional_ltv by cohort and period number.

cohort_pivot_1 = df_cohort_final.pivot_table(index = 'cohort',
                                     columns = 'period_number',
                                     values = 'traditional_ltv')

#type2: Create a pivot table to display traditional_ltv by period number and cohort.

cohort_pivot_2 = df_cohort_final.pivot_table(index = 'period_number',
                                     columns = 'cohort',
                                     values = 'traditional_ltv')


#type3: Convert traditional_ltv percentages to absolute values.
    
cohort_pivot_3 = df_cohort_final.pivot_table(index = 'cohort',
                                     columns = 'period_number',
                                     values = 'traditional_ltv')

cohort_size_values = df_cohort_final.pivot_table(index = 'cohort',
                                     columns = 'period_number',
                                     values = 'traditional_ltv')

cohort_size = cohort_size_values.iloc[:,0]

with sns.axes_style("white"):
    fig, ax = plt.subplots(1, 2, figsize=(12, 8), sharey=True, gridspec_kw={'width_ratios': [1, 11]})
    
    # Show churn rates by cohort and period number as a heatmap.
    
    sns.heatmap(cohort_pivot_3, 
                mask=cohort_pivot_3.isnull(), 
                annot=True, 
                fmt='', 
                cmap='RdYlGn', 
                ax=ax[1])
    ax[1].set_title('Monthly Cohorts: Customer Lifetime Value', fontsize=16)
    ax[1].set(xlabel='Month of Journey',
              ylabel='')

     # Show cohort sizes by cohort and period number as a heatmap.
     
    cohort_size_df = pd.DataFrame(cohort_size).rename(columns={0: 'No. of customers acquired'})
    white_cmap = mcolors.ListedColormap(['white'])
    sns.heatmap(   cohort_size_df, 
                annot=True, 
                cbar=False, 
                fmt='g', 
                cmap=white_cmap, 
                ax=ax[0])

    fig.tight_layout()

1) High CLTV for the December 2009 cohort: This suggests that the business may want to consider running a targeted marketing campaign to encourage repeat purchases from customers in this cohort. We could also explore opportunities to upsell or cross-sell to these customers to increase their overall lifetime value.

2) Low CLTV for certain cohorts: Customers who were acquired in February, March, April, and May 2010 have low CLTV. This highlights the potential for businesses to provide tailored recommendations and promotions to these customers, taking into account their unique preferences and purchase history.

# Compute the average retention rate for each period number

avg_retention_rates = avg_retention_rates[avg_retention_rates['period_number'] <= 10]

# Set up the figure and axes

fig, ax = plt.subplots(figsize=(12, 8))

# Plot the line chart using seaborn

sns.lineplot(x="period_number", y="traditional_ltv", data=avg_retention_rates, ax=ax, color='darkred', ci = None)
#plt.fill_between(x="period_number", y1="retention_rate_pc", data=avg_retention_rates, alpha=0.3, color='darkgreen')

# Add annotations to the line chart

for x, y in zip(avg_retention_rates['period_number'], avg_retention_rates['traditional_ltv']):
    ax.text(x=x, y=y+3.5, s=f"${y:.1f}", ha='center', va='bottom', color='black')

# Set the title and axis labels

ax.set_title("Overall CLTV Over Time")
ax.set_xlabel("Month of Journey")
ax.set_ylabel("CLTV ($)")

# Set the x-axis tick locations and labels

ax.set_xticks(avg_retention_rates['period_number'])
ax.set_xticklabels(avg_retention_rates['period_number'], rotation=0, ha='right')

# Display the plot

plt.show()

The overall CLTV graph shows us the traditional lifetime value of customers at the organization, starting from the first month when a customer gets onboarded to the organization, and modeling all the way until their 10th month of the customer journey.

Based on the chart provided, it is evident that a profitable acquisition cost for customers who have been with us for 8 months would be around 310. This means that if a customer remains with us for 8 months, they are worth 310. Assuming that the cost of acquiring a new customer in FY2010 was 35, the CAC to LTV ratio would be 6:1, which is considered favorable for a retail business.

Segment customers based on LTV:

In this code snippet, we basically grouped the dataset by cohort, transaction year-month, period number, and customer ID to identify customers in each cohort. Further, we filtered the customer data to only keep customers who have a valid CLTV value.

In the following stages, we performed supervised segmentation in order to group customers based on their CLTV score. Customers whose CLTV score is at or above the 80th percentile were classified as “high_cltv”, while those with a score between the 50th and 80th percentile were classified as “medium_cltv”. Customers with a score below the median were classified as “low_cltv”.

Overall, this code is an important step toward identifying and segmenting customers based on their CLTV values, which can in turn be used to predict future Customer Life Time Value.

#Customers in each cohort

cohort_customers = output_data.groupby(['cohort', 'record_level_transaction_yr_month', 'period_number', 'customer_id']) \
                             .agg(cltv_interim=('traditional_ltv', 'min')) \
                             .reset_index()

cohort_customers = pd.merge(cohort_customers, df_cohort_final, on = ['cohort', 'record_level_transaction_yr_month', 'period_number'], how='left')

cohort_customers["ltv_flag"] = pd.Series(np.where(cohort_customers["traditional_ltv"].notna() ==True,1, 0))

cohort_customers = cohort_customers[cohort_customers["ltv_flag"] == 1]

#Customer Segments by CLTV

customers_ltv = cohort_customers.groupby(['customer_id'])['cohort','period_number', 'traditional_ltv'].max().reset_index()

# Calculate the 80th percentile of traditional_ltv

traditional_ltv_80p = df_cohort_final.traditional_ltv.quantile(0.8)

# Create a new column with "high_cltv" for customers with traditional_ltv >= 80th percentile, and "unknown" for others

customers_ltv["traditional_ltv_segments"] = np.where(customers_ltv["traditional_ltv"] >= traditional_ltv_80p, "high_cltv", "unknown")

# Calculate the 50th and 80th percentile of traditional_ltv

q_low, q_high = customers_ltv["traditional_ltv"].quantile([0.5, 0.8])

# Create a boolean mask for traditional_ltv values between the 50th and 80th percentile

mask = (q_low <= customers_ltv["traditional_ltv"]) & (customers_ltv["traditional_ltv"] < q_high)

# Replace values in the "traditional_ltv_segments" column that meet the mask criteria with "medium_cltv"

customers_ltv["traditional_ltv_segments"] = customers_ltv["traditional_ltv_segments"].mask(mask, "medium_cltv")

# Calculate the median of traditional_ltv from df_cohort_final

traditional_ltv_median = df_cohort_final.traditional_ltv.quantile(0.5)

# Create a boolean mask to identify traditional_ltv values less than the median

traditional_ltv_mask = customers_ltv["traditional_ltv"] < traditional_ltv_median

# Assign "low_cltv" to the traditional_ltv_segments column where the mask is True

customers_ltv.loc[traditional_ltv_mask, "traditional_ltv_segments"] = "low_cltv"

Segment customers based on LTV:

To accurately predict cohort-wise customer lifetime value and Retention Rate, I have utilized various imputation methods including Bayesian, KNN, and random forest. I found that random forest was the most effective method for filling in missing data in the cohort retention matrix for the chosen transactional customer dataset. With this powerful tool, we can confidently predict future CLTV and retention rates in the cohort matrix.

Check out the code below for a demonstration of how we can implement these techniques in Python.

Step 14: Predict Customer Life Time Value:

The first step is to split the data into features (X) and target (y), where X contains the row and column indices and y contains the customer lifetime values.

Then, a random forest regressor is trained on the non-missing values of the data using the scikit-learn RandomForestRegressor class. To evaluate the performance of the random forest regressor, I split the data into a training set and a test set, and calculated metrics such as mean squared error (MSE) and R-squared (R²) on the test set.

Further, I did hyperparameter tuning using the random search technique to search over a range of hyperparameters and to find the best combination of hyperparameters that optimizes a performance metric such as R-squared on a validation set.

The trained model is used to predict the missing values, and the missing values in the original data array are replaced with the predicted values. Finally, the output data is visualized using heatmaps in Seaborn and Matplotlib.

cohort_pivot_3 = df_cohort_final.pivot_table(index = 'cohort',
                                     columns = 'period_number',
                                     values = 'traditional_ltv')

data = cohort_pivot_3.values

# Split the data into features (X) and target (y)
# X contains the row and column indices
# y contains the customer lifetime value

X = np.argwhere(~np.isnan(data))
y = data[~np.isnan(data)]

# Split the data into training and test sets

X_train, X_test, y_train, y_test = train_test_split(X, y, test_size=0.2, random_state=42)

# Define the imputation methods

imputation_methods = {
    'Random Forest': RandomForestRegressor(n_estimators=100, random_state=42),
    'Bayesian': HistGradientBoostingRegressor(random_state=42),
    'KNN': KNeighborsRegressor(n_neighbors=5)
   
}

# Train each imputation method using the training set and evaluate its performance using R-squared score

r2_scores = {}
for name, method in imputation_methods.items():
    # Fit the imputation method on the training set
    method.fit(X_train, y_train)
    # Predict the missing values in the test set
    y_pred = method.predict(X_test)
    # Evaluate the performance using R-squared score
    r2_scores[name] = r2_score(y_test, y_pred)

# Print the R-squared scores for each imputation method

print("R-squared scores:")
for name, score in r2_scores.items():
    print(f"{name}: {score:.2f}")


# Select the imputation method with the best performance

best_method_name = max(r2_scores, key=r2_scores.get)
best_method = imputation_methods[best_method_name]
print(f"\nBest imputation method: {best_method_name}")


# Define the hyperparameter search space

param_distributions = {
    'n_estimators': [100, 200, 300, 400, 500],
    'max_depth': [10, 20, 30, None],
    'min_samples_split': [2, 5, 10],
    'min_samples_leaf': [1, 2, 4],
    'max_features': ['auto', 'sqrt', 'log2']
}

# Train a random forest regressor using random search with cross-validation

rf = RandomForestRegressor()
rs = RandomizedSearchCV(rf, param_distributions, n_iter=100, cv=3, scoring='r2', random_state=42)
rs.fit(X_train, y_train)


# Print the best hyperparameters

print("Best hyperparameters: ", rs.best_params_)

# Predict the missing values in the original data array using the best imputation method

# Replace the missing values in the original data array with the predicted values

predicted_values = best_method.predict(np.argwhere(np.isnan(data)))
data_predicted = data.copy()
data_predicted[np.isnan(data)] = predicted_values

# Convert the data to a DataFrame and add row and column indices

df = pd.DataFrame(data_predicted,index=[ '2009-12', '2010-01', '2010-02', '2010-03', '2010-04', '2010-05', '2010-06','2010-07', '2010-08', '2010-09','2010-10', '2010-11'], columns=['0', '1', '2', '3', '4', '5', '6', '7', '8', '9', '10', '11', '12'])


# Create a heatmap with actual and predicted values distinguished by different colors

sns.set(font_scale=0.8)
fig, ax = plt.subplots(figsize=(12, 8))
sns.heatmap(df, cmap='YlGn', annot=False, fmt=".2f",  cbar=False, ax=ax)
for i in range(df.shape[0]):
    for j in range(df.shape[1]):
        value = df.iloc[i, j]
        if np.isnan(data[i, j]):
            text_color = 'red'
        else:
            text_color = 'black'
        ax.text(j + 0.5, i + 0.5, f'{value:.2f}', ha='center', va='center', color=text_color)
ax.set_title("Cohort Matrix with Heatmap")
ax.set_xlabel("Month of Customer Journey")
ax.set_ylabel("Month when Customer got Acquired")
plt.show() 


What’s Next?

1) Productionize CLTV Model: Run the CLTV model monthly and compare actual vs. predicted results. Create API endpoints and ensure that you feed the current and predicted lifetime values of each customer into your organization’s Customer Data Platform. Collaborate with your marketing automation team to use these customer attributes for targeted web push, SMS push, browser pop-ups, social media ads, and email marketing initiatives.

2) Segment your top-performing customers: Identify your highest customer lifetime value cohort groups and work closely with your marketing communications team to set up upselling and cross-selling marketing campaigns. These campaigns can be run through paid and organic marketing channels and will help you maximize your return on investment.

3) Set up Marketing Retention Campaigns: Identify the customers in the cohorts that have a higher churn rate and initiate retention campaigns. These campaigns can include refer-a-friend gift vouchers, coupon codes, promotions, loyalty programs, and other targeted paid and organic marketing initiatives. Building a long-term relationship with your customers is crucial, so be sure to evaluate the effectiveness of these campaigns by measuring the CLTV and retention rate of those cohorts in subsequent months.

4) Analyze top-selling categories and subcategories: Keep track of which products or services generate the most revenue and identify any CLTV and Retention patterns in customer behavior. Use this information to develop targeted marketing campaigns and optimize your product offerings.

5) Import Customer Acquisition Cost: Overlay customer acquisition cost on top of the CLTV values to benchmark and evaluate the organization’s ongoing marketing campaign initiatives. This will provide valuable insights into the cost-effectiveness of different campaigns and channels.

6) Share Key Findings: Keep your sales and marketing team in the loop by communicating significant insights related to customer retention rate and lifetime value from the cohort analysis and CLTV predictions. Additionally, inform your marketing retention team about any noteworthy patterns that are identified during this journey.

I hope these actions will help you maximize your customer lifetime value and build stronger relationships with your customers. Remember, these are ongoing processes, so continue to refine your strategy and adjust your tactics based on what works best for your business. Good luck.

Conclusion:

In conclusion, predicting customer lifetime value through cohort analysis in Python is an essential skill for any business owner or marketer. Cohort analysis can help you identify customer behavior patterns, while machine learning techniques can be used to predict future customer actions. By applying these techniques, you can optimize your marketing campaigns, improve your profits, and make better decisions about your customers.

I hope this post has helped get you started and encouraged you to explore the world of CLTV modeling. The possibilities are endless, and the results could be game-changing for your business. So, start implementing these techniques and see the positive impact on your business growth. Thank you for reading!

GitHub Repository

I have learned (and continue to learn) from many folks in Github. Hence sharing my entire python script and supporting files in a public GitHub Repository in case if it benefits any seekers online. Also, feel free to reach out to me if you need any help in understanding the fundamentals of supervised machine learning algorithms in Python. Happy to share what I know:) Hope this helps!

" />
Sree

Full-Stack Data Scientist | Marketing

Predict Retention Rate & LTV

Customer Retention Analytics & Life time value modeling

Introduction

As a business owner or marketer, understanding our customers’ lifetime value is crucial to maximizing our profits and improving the overall marketing strategy. In this blog post, let’s go through the process of predicting customer lifetime value using cohort analysis in Python.

Cohort analysis is a powerful technique that helps businesses identify groups of customers with similar characteristics and behaviors. By grouping customers into cohorts, we can better understand how their behavior changes over time and predict their future actions. Using Python, I’ll show you how to calculate key metrics such as retention rates and lifetime values for each cohort.

But simply calculating these metrics is not enough - we also need to use machine learning techniques to predict future customer behavior. In this post, I’ll show you how to use a popular ensemble learning method called random forest to predict future customer lifetime value based on past behavior.

Even if you’re new to Python or machine learning, this post will provide you with a step-by-step guide on how to use these powerful techniques to make better decisions about your customers. Whether you’re a marketer looking to optimize your campaigns or a business owner looking to improve your profits, understanding customer lifetime value is critical to success. So let’s get started!

Understanding Cohort Analysis:

Cohort analysis is a powerful tool that can help businesses make data-driven decisions and optimize their customer engagement and retention strategies. By grouping customers based on shared characteristics and analyzing their behavior over time, businesses can gain valuable insights into customer behavior and make informed decisions about how to grow and succeed in a competitive marketplace.

One common way to perform cohort analysis is to group customers by the month in which they made their first purchase. This allows us to compare how different cohorts of customers behave over time, and identify patterns and trends in customer behavior.

For example, let’s say we have an online clothing store. We can group our customers into cohorts based on the month they made their first purchase and track how much they spend over time. By comparing different cohorts, we might find that customers who made their first purchase in December tend to spend more overall than customers who made their first purchase in January.

Another important metric we can calculate using cohort analysis is the retention rate. The retention rate measures the percentage of customers who make a repeat purchase after their initial purchase. By tracking retention rates for different cohorts, we can see how customer loyalty and engagement change over time.

Using cohort analysis, we can also calculate customer lifetime value (CLTV), which is a measure of how much revenue a customer is expected to generate over their lifetime. Understanding CLTV for different customer cohorts can help us make strategic decisions about marketing, customer acquisition, and product development.

Lastly, by combining cohort analysis with machine learning, businesses can gain a deeper understanding of their customers and make more accurate predictions about their future behavior.

How do we compute Customer LifeTime Value:

While there is no one-size-fits-all solution for predicting customer lifetime value, the traditional CLTV model is a proven method that has been used successfully by businesses for decades. The calculation is quite effective because it takes into account the Customer Retention Rate, Profit Margin, Discount Rates, and the average number of transactions over the life span of the customers.

1) Avg. Profit Margin Per Customer Life Span = The average profit we make on each customer over the span of their lifetime. It is essentially the product of the following: Average Revenue per customer * yearly profit margin * avg. no. of purchases per customer life span * customer life span

2) Customer Retention Rate = The number of cycles that we expect the customer to keep purchasing from us.

3) Discount Rate = This is the interest rate applied in discounted cash flow analysis to learn the current value of future cash flows.

In the next section, let’s go through a step-by-step guide to perform cohort analysis in Python and use it to predict customer lifetime value.

Data Preparation:

Importing and Preprocessing the Data: We will be using a publicly available transactional customer dataset from an online retail store in the UK. The dataset is available in the GitHub Repository that we will be using for this tutorial. Before we begin analyzing the data, we need to perform some preprocessing steps to ensure that the data is in a format that can be easily analyzed.

In this section, I’ll share the Python code that we used to clean and prepare the data for the predictive analytics of Retention Rate and Customer Life Time Value (CLTV). I’ll also provide comments to explain the code and summarize the key steps to make it easy to follow along. So let’s dive in!

Step 0:Restart the session and clear all temporary variables:

try:
    from IPython import get_ipython
    get_ipython().magic('clear')
    get_ipython().magic('reset -f')
except:
    pass

Step 1:Import relevant libraries:

Import all the relevant Python libraries for building supervised machine learning algorithms.

#Standard libraries for data analysis:

import numpy as np
import matplotlib.pyplot as plt
import pandas as pd
from scipy.stats import norm, skew
from scipy import stats
import statsmodels.api as sm

# sklearn modules for data preprocessing:

from sklearn.impute import SimpleImputer
from sklearn.preprocessing import LabelEncoder, OneHotEncoder
from sklearn.compose import ColumnTransformer
from sklearn.preprocessing import OneHotEncoder
from sklearn.preprocessing import StandardScaler

#sklearn modules for Model Selection:

from sklearn.ensemble import RandomForestRegressor
from sklearn.neighbors import KNeighborsRegressor
from sklearn.experimental import enable_hist_gradient_boosting  # Required to enable HGBR
from sklearn.ensemble import HistGradientBoostingRegressor


#sklearn modules for Model Evaluation & Improvement:

from sklearn.model_selection import train_test_split
from sklearn.metrics import r2_score
from sklearn.model_selection import train_test_split, RandomizedSearchCV

#Standard libraries for data visualization:

import seaborn as sns
from matplotlib import pyplot
import matplotlib.pyplot as plt
import matplotlib.pylab as pylab
import matplotlib.colors as mcolors
import matplotlib 
%matplotlib inline
color = sn.color_palette()
import matplotlib.ticker as mtick
from IPython.display import display
pd.options.display.max_columns = None
from pandas.plotting import scatter_matrix
from sklearn.metrics import roc_curve

#Miscellaneous Utilitiy Libraries:

import random
import os
import re
import sys
import timeit
import string
import time
import warnings
from datetime import datetime
from time import time
from operator import attrgetter
from dateutil.parser import parse
import joblib

Step 2:Set up the current working directory:

os.chdir(r"C:/Users/srees/Propensity Scoring Models/Predict Customer lifetime value/")

Step 3:Import the dataset:

Let’s load the input dataset into the Python notebook in the current working directory.

1) dtype is defined for the customer_id and transaction_id columns.

2) parse_dates is defined for the transaction_date column.

dataset = pd.read_excel('online_retail_monthly.xlsx',
                   dtype={'customer_id': str,
                          'transaction_id': str},
                   parse_dates=['transaction_date'])


df = dataset

The imported dataset is stored in the df variable.

Step 4:Evaluate the data structure:

df.head()

df.columns

df.describe()

The output of the describe() method provides a quick summary of the key statistical measures of the numerical columns in our dataset. It can help us to get a general understanding of our dataset and detect any outliers, missing values, or potential data quality issues. In our case, it shows the summary statistics of the “quantity”, “price”, and “transaction_amount” columns.

From the output, we can observe that the average “quantity” is around 12, the average “price” is around 3, and the average “transaction_amount” is around 20. The standard deviation (std) of these variables is quite high, indicating that they are dispersed across a wide range of values. Additionally, the minimum and maximum values of each variable indicate the range of values they can take. The median or the 50th percentile (50%) of the variables is closer to the 25th percentile (25%) than the 75th percentile (75%), which suggests that the distribution of these variables might be skewed to the right.

Ensure column data types and identify missing values:

It is crucial to constantly monitor missing values within a dataset, as they can adversely affect model construction and accuracy.

df.columns.to_series().groupby(df.dtypes).groups

df.isna().any()

The output of the code snippet “df.isna().any()” shows which columns in our dataset contain missing values (NaN). In our case, three columns have missing values: “transaction_item_description”, “customer_id”, and “first_transaction_month”.

It’s important to handle missing values before performing any analysis on the data as they can lead to biased or inaccurate results. We can either remove the rows with missing values or impute the missing values with appropriate methods depending on the context and nature of the missing data.

Step 5: Clean the dataset:

df = df.dropna(subset=["transaction_id", "customer_id", "transaction_date", "first_transaction_month"])

This will drop all rows that have missing values in any of the specified columns (i.e., “transaction_id”, “customer_id”, “transaction_date”, and “first_transaction_month”) and return a new DataFrame.

# Replace NA's in "transaction_amount" with 0
df["transaction_amount"].fillna(0, inplace=True)

# Filter data & select only monthly FMCG transactions in UK
df = df[(df["frequency_of_payment"] == "monthly") & 
        (df["product_type"] == "fast_moving_consumer_goods") & 
        (df["country"] == "United Kingdom")]

#Filter out all the returns
df = df.query('quantity > 0')

Cohort Analysis:

To perform cohort analysis, businesses typically follow a few key steps. First, they identify the cohort groups they want to analyze, such as customers who made their first purchase in a given month. Then, they calculate retention rates for each cohort group over time, which shows how many customers from each group remain active over time. And then they compute Customer Lifetime Value.

In the following sections, I’ll walk you through the steps to prepare the data for analysis and generate valuable insights.

Step 6: Retention Rate:

In the code snippet provided, we first converted the “first_transaction_month” and “transaction_date” columns into datetime format and grouped customers by their first transaction month. We then computed the retention rate for each cohort by finding the percentage of customers who remained active in each subsequent period.

Finally, we calculated the churn rate as the complement of the retention rate, or the percentage of customers who did not remain active. This information can be extremely useful in understanding customer behavior over time and optimizing marketing and engagement efforts.

# Convert the 'first_transaction_month' column into a monthly period

df['first_transaction_month'] = pd.to_datetime(df['first_transaction_month'], format='%Y-%m-%d').dt.to_period('M')

# Convert the 'transaction_date' column into a monthly period

df["record_level_transaction_month"] = df["transaction_date"].dt.to_period('M')

# Rename the 'first_transaction_month' column as 'cohort'

df.rename(columns={'first_transaction_month': 'cohort'}, inplace=True)

# Calculate the number of unique customers per cohort and 'record level transaction month'

df_cohort_1 = (df
    .groupby(["cohort", "record_level_transaction_month"])
    .agg(no_of_customers=("customer_id", "count"))
    .reset_index()
)

# Compute the difference in months/periods between 'cohort' and 'record_level_transaction_month'

df_cohort_1['period_number'] = df_cohort_1.apply(lambda row: (row['record_level_transaction_month'] - row['cohort']).n, axis=1)

# Calculate the total number of customers in the cohort and the retention rate for each period

mask1 = df_cohort_1['period_number'] == 0
interim_tbl = df_cohort_1.loc[mask1, ['cohort', 'no_of_customers']].rename(columns={'no_of_customers': 'total_customers'})
df_cohort_1 = df_cohort_1.merge(interim_tbl, on='cohort', how='left')
df_cohort_1['retention_rate_%'] = (100 * df_cohort_1['no_of_customers'] / df_cohort_1['total_customers']).round(2)

# Calculate the churn rate as the complement of the retention rate, and handle zero churn rates

df_cohort_1["churn_rate_%"] = (100 - df_cohort_1["retention_rate_%"]).round(2)
df_cohort_1.loc[df_cohort_1["churn_rate_%"] == 0.00, "churn_rate_%"] = 100

Step 7: Active & Lost Customers:

Once the cohort analysis has been performed, we can use the resulting cohort groups to identify active and lost customers over time. This can be done by calculating the number of customers who remain active in each cohort group over time, as well as the number of customers who become inactive. Finally, we merged this information back into the original cohort analysis DataFrame and rearranged the columns for readability.

By identifying active and lost customers over time, businesses can gain valuable insights into how customer behavior changes over time, and develop more accurate and effective strategies for retaining customers and maximizing customer lifetime value. This can lead to increased customer loyalty, higher revenues, and greater long-term success for the business.

# Assign the number of active customers in each passing year of a cohort to the "active_cust" column

df_cohort_1 = df_cohort_1.assign(active_cust=df_cohort_1["no_of_customers"])

# Compute the lost customers for each cohort and period by taking the difference between the current and previous period's "active_cust" values

lost_customers = (
    df_cohort_1
    .groupby(['cohort', 'record_level_transaction_month', 'period_number'])['active_cust']
    .sum()
    .groupby(level=0)
    .diff()
    .abs()
    .reset_index(name='lost_cust')
)

# Merge the "lost_customers" data back into the original "df_cohort_1" DataFrame

df_cohort_1 = df_cohort_1.merge(lost_customers, on=['cohort', 'record_level_transaction_month', 'period_number'], how='left')

# Replace any missing "lost_cust" values with the corresponding "active_cust" values

df_cohort_1['lost_cust'].fillna(df_cohort_1['active_cust'], inplace=True)

#Rearrange the column positions:

select = ['cohort', 'record_level_transaction_month', 'period_number', 'no_of_customers', 'retention_rate_%', 'churn_rate_%', 'active_cust', 'lost_cust']
df_cohort_1 = df_cohort_1.loc[:, select]


Step 8: Cumulative Revenue:

In the code below, we have computed cumulative revenue for each cohort and period. This allows us to see how much revenue each cohort generates over time, and how it compares to other cohorts.

# Aggregate revenue data by cohort and record level transaction month
  
df_cohort_2 = (
    df.groupby(["cohort", "record_level_transaction_month"])
    ["transaction_amount"]
    .sum()
    .reset_index(name="revenue")
)

# Calculate the time difference in months between cohort and transaction month
         
df_cohort_2['period_number'] = (df_cohort_2.record_level_transaction_month - df_cohort_2.cohort).apply(attrgetter('n'))

# Compute cumulative revenue for each cohort and period

cumulative_revenue = (df_cohort_2
                     .groupby(['cohort', 'record_level_transaction_month', 'period_number'])['revenue']
                     .sum()
                     .groupby(level=0)
                     .cumsum()
                     .rename('cumulative_revenue')
                     .reset_index())

# Merge cumulative revenue data into the original cohort analysis

df_cohort_2 = df_cohort_2.merge(cumulative_revenue, on=['cohort', 'record_level_transaction_month', 'period_number'], how='left')

# Rearrange columns for readability

df_cohort_2 = df_cohort_2[['cohort', 'record_level_transaction_month', 'period_number', 'revenue', 'cumulative_revenue']]

Step 9: Average Revenue per User (ARPU):

# Merge two cohort dataframes on specific columns

df_cohort_final = pd.merge(df_cohort_1, df_cohort_2, on=['cohort', 'record_level_transaction_month', 'period_number'], how='left')

# Calculate average revenue per user for each cohort and time period

df_cohort_final["avg_revenue_per_user"] = df_cohort_final["cumulative_revenue"] / df_cohort_final["no_of_customers"]

# Round the average revenue per user to 2 decimal places

df_cohort_final["avg_revenue_per_user"] = df_cohort_final["avg_revenue_per_user"].round(2)

Step 10: Customer Life Time Value (CLTV):

In this code, we prepared our transactional customer dataset to compute the customer lifetime value. After cleaning the data, we grouped the transactions by customer ID to get the first transaction date of each customer. And then we calculated the number of periods between the transaction date & cohort date to identify the months of customer journey.

# CLTV Computation - Part 1:

# Create a copy of the original dataset to avoid modifying it directly

dataset_1 = dataset.copy()

# Remove transactions with missing transaction dates

dataset_1 = dataset_1[pd.notnull(dataset_1["transaction_date"])]

# Convert transaction_date column to datetime data type

dataset_1['transaction_date'] = dataset_1['transaction_date'].astype('datetime64')

# Group transactions by customer ID and get the first transaction date for each customer

first_transaction_date = dataset_1.groupby('customer_id')['transaction_date'].agg('min')

# Merge the first_transaction_date column into the original dataset

dataset_1 = dataset_1.merge(first_transaction_date, how='left', on='customer_id', suffixes=('', '_first'))

# Rename the new column to first_transaction_date

dataset_1.rename(columns={'transaction_date_first': 'first_transaction_date'}, inplace=True)

# Remove rows with missing first_transaction_date values

dataset_1.dropna(subset=['first_transaction_date'], inplace=True)

#Convert date columns to datetime format and then back to string format

date_cols = ["transaction_date", "first_transaction_date"]
dataset_1[date_cols] = dataset_1[date_cols].apply(pd.to_datetime, format='%Y-%m-%d').astype(str)

# Converts the "transaction_date" and "first_transaction_date" columns in "dataset_1" from strings to datetime objects 
#using the "apply()" method and assigns the results back to the same columns.

dataset_1[["transaction_date", "first_transaction_date"]] = dataset_1[["transaction_date", "first_transaction_date"]].apply(pd.to_datetime)

# Adds two new columns to dataset_1 with the year of each transaction.

dataset_1 = dataset_1.assign(first_transaction_yr=dataset_1['first_transaction_date'].dt.to_period('Y'),
                             record_level_transaction_yr=dataset_1['transaction_date'].dt.to_period('Y'))

# Convert date columns into year-month period format and assign to new columns

dataset_1[['first_transaction_yr_month', 'record_level_transaction_yr_month']] = dataset_1[['first_transaction_date', 'transaction_date']].apply(lambda x: x.dt.to_period('M'))

dataset_1.rename(columns={'first_transaction_yr_month':'cohort'}, inplace = True)

# Calculate the number of periods between transaction date and cohort date

dataset_1['period_number'] = (dataset_1.record_level_transaction_yr_month - dataset_1.cohort).apply(attrgetter('n'))

dataset_1.query("cohort >= '2009-12'", inplace=True)

# Filter dataset_1 to include only records from past cohorts and exclude current month

today_str = datetime.today().strftime('%Y-%m')
dataset_1 = dataset_1[(dataset_1["cohort"] < today_str) & (dataset_1["record_level_transaction_yr_month"] != today_str)] 


The following segment of the code involved grouping our data by a specific set of columns, such as cohort and transaction month, and then figuring out the number of unique transactions and the number of purchases per customer.

#CLTV Computation - Part 2: 

df_cohort_final.rename(columns={'record_level_transaction_month':'record_level_transaction_yr_month'}, inplace = True)

# Defining the column names for grouping the dataset

column_names  = ['cohort','record_level_transaction_yr_month' ,'period_number' ]

# Grouping the dataset by specified column names

sector = dataset_1.groupby (column_names)

# Aggregating transaction_id and customer_id columns by counting unique values

df_cohort_3 = sector.agg({"transaction_id" : "nunique", 
             "customer_id" : "nunique"})

# Calculating the number of purchases per customer

df_cohort_3["no_of_cust_purchases"] =  df_cohort_3["transaction_id"] / df_cohort_3["customer_id"]

df_cohort_3["no_of_cust_purchases"]  = round(df_cohort_3["no_of_cust_purchases"], 1)

# Merging df_cohort_final with df_cohort_3 on specified columns

df_cohort_final = pd.merge(df_cohort_final,df_cohort_3, on=['cohort','record_level_transaction_yr_month' ,'period_number'], how='left') 

df_cohort_final = df_cohort_final.rename(columns={'transaction_id':'total_transactions', 'customer_id':'total_customers'})

# Adding a new column period_number_for_cltv which is period_number+1

df_cohort_final["period_number_for_cltv"] = df_cohort_final["period_number"] +1

# Calculating the retention rate for each cohort by grouping and shifting the retention_rate_% column

df_cohort_final["retention_rate_for_cltv"] = df_cohort_final.groupby(["cohort"])["retention_rate_%"].shift(-1)

In this part of the code, we grouped the data by ‘cohort’ to calculate the average retention rate for each cohort. This average retention rate is then merged back into the original data frame, and used to calculate the average profit margin for each cohort. Finally, a traditional customer lifetime value (LTV) is computed for each row using the average profit margin, retention rate, and discount rate. As I mentioned earlier, the traditional LTV is nothing but a metric that helps us to determine how much we can spend on acquiring & retaining customers while generating profit.

#CLTV Computation - Part 3:

column_names  = ['cohort']

# Group the dataframe 'df_cohort_final' by the column 'cohort'

sector = df_cohort_final.groupby (column_names)

# Compute the mean of the 'retention_rate_for_cltv' column for each group 

interim_tbl2 = sector.agg({"retention_rate_for_cltv" : "mean"})

interim_tbl2.rename(columns={'retention_rate_for_cltv':'retention_rate_cohort_avg'}, inplace = True)

# Merge the 'interim_tbl2' dataframe with 'df_cohort_final' on the 'cohort' column

df_cohort_final = pd.merge(df_cohort_final,interim_tbl2, on=['cohort'], how='left')

df_cohort_final["retention_rate_cohort_avg"] = pd.to_numeric(df_cohort_final["retention_rate_cohort_avg"], errors="coerce").round(1)

df_cohort_final["retention_rate_for_cltv"].fillna(df_cohort_final["retention_rate_cohort_avg"], inplace=True)

# Compute 'avg_profit_margin_per_cohort' column by multiplying different columns of 'df_cohort_final'

df_cohort_final["avg_profit_margin_per_cohort"] = np.multiply(
    np.multiply(df_cohort_final["avg_revenue_per_user"], 0.2),
    np.multiply(df_cohort_final["period_number_for_cltv"], df_cohort_final["no_of_cust_purchases"])
)

# Define a discount rate of 4%

discount_rate = 0.04

# Compute the traditional LTV for each row using 'avg_profit_margin_per_cohort', 'retention_rate_for_cltv' and 'discount_rate'

df_cohort_final["traditional_ltv"] = (
    df_cohort_final["avg_profit_margin_per_cohort"] *
    ((df_cohort_final["retention_rate_for_cltv"] / 100) /
     ((1 + discount_rate) - (df_cohort_final["retention_rate_for_cltv"] / 100)))
)

# Convert the 'traditional_ltv' column to numeric data type and round off to 1 decimal place

df_cohort_final["traditional_ltv"] = pd.to_numeric(df_cohort_final["traditional_ltv"], errors="coerce").round(1)

#Final selection:

df_cohort_final.rename(columns={'retention_rate_%':'retention_rate_pc', 'churn_rate_%':'churn_rate_pc' }, inplace = True)

df_cohort_final["cohort"] = df_cohort_final["cohort"].astype('str', copy=False)

df_cohort_final = df_cohort_final.astype({'record_level_transaction_yr_month': 'str'})

#CLTV Computation - Part 4:

column_names  = ['cohort','record_level_transaction_yr_month' ,'period_number' ,'customer_id','product_type', 'transaction_item_code', 
       'transaction_item_description']

sectors = dataset_1.groupby (column_names)

# Aggregate grouped data based on specified metrics

cust_profile_output = sectors.agg({"transaction_id" : "nunique", 
             "quantity" : "sum",
             "transaction_amount": "sum"})

cust_profile_output .reset_index(inplace = True)

# Merge the output data with another dataframe based on specified columns

output_data= cust_profile_output.merge(df_cohort_final,  on = ['cohort', 'record_level_transaction_yr_month', 'period_number'],how = "left",)

# Calculate the rank of each row within each group based on specified columns

output_data['RN'] = output_data.sort_values(['cohort','record_level_transaction_yr_month','period_number'], ascending=True) \
             .groupby(['cohort','record_level_transaction_yr_month','period_number']) \
             .cumcount() + 1

output_data.rename(columns={'retention_rate_%':'retention_rate', 'churn_rate_%':'churn_rate' }, inplace = True)

# Fill missing values in a specific column with another column's values where RN is 1

output_data.loc[output_data["RN"] == 1, "total_acquired_customers"] = output_data["total_customers"]
output_data["total_acquired_customers"].fillna(0, inplace=True)

output_data.loc[output_data["RN"] == 1, "total_customers"] = output_data["no_of_customers"]
output_data["total_customers"].fillna(0, inplace=True)

output_data.loc[output_data["RN"] == 1, "total_transactions"] = output_data["total_transactions"]
output_data["total_transactions"].fillna(0, inplace=True)

# Replace values in specific columns with 0 where RN is not 1

mask = output_data["RN"] == 1
output_data.loc[~mask, ["no_of_cust_purchases", "retention_rate", "retention_rate_for_cltv", "retention_rate_cohort_avg"]] = 0

mask = output_data["RN"] == 1
output_data.loc[~mask, ["churn_rate", "active_cust", "lost_cust", "revenue", "cumulative_revenue", "avg_revenue_per_user", "avg_profit_margin_per_cohort", "traditional_ltv"]] = 0

Data Visualization:

Let’s try to visualize what we achieved so far. Visualizing cohort-wise CLTV and retention rate is essential in gaining a deeper understanding of customer behavior and the impact of cohorts on the overall CLTV of a business.

By using data visualization techniques, we can quickly identify any patterns or trends that may exist within the data, and make informed decisions about how to optimize our marketing and retention strategies. In this section, I’ll provide step-by-step instructions on how to visualize cohort-wise CLTV and retention rate using Python libraries such as Seaborn and Matplotlib.

Step 11: Visualize Retention Rate:

The below-mentioned code creates three pivot tables to show retention rates by cohort and period number which is in turn used to create a heatmap visualization.

#type1: Create a pivot table to show retention rates by cohort and period number.
cohort_pivot_1 = df_cohort_final.pivot_table(index = 'cohort',
                                     columns = 'period_number',
                                     values = 'retention_rate_pc')

#type2: Create a pivot table to show retention rates by period number and cohort.
cohort_pivot_2 = df_cohort_final.pivot_table(index = 'period_number',
                                     columns = 'cohort',
                                     values = 'retention_rate_pc')


#type3: Add a new column to the DataFrame to show retention rates as absolute values. 
df_cohort_final["retention_rate_abs_val"] = df_cohort_final["retention_rate_pc"] /100

cohort_pivot_3 = df_cohort_final.pivot_table(index = 'cohort',
                                     columns = 'period_number',
                                     values = 'retention_rate_abs_val')

cohort_size_values = df_cohort_final.pivot_table(index = 'cohort',
                                     columns = 'period_number',
                                     values = 'no_of_customers')

cohort_size = cohort_size_values.iloc[:,0]

with sns.axes_style("white"):
    fig, ax = plt.subplots(1, 2, figsize=(12, 8), sharey=True, gridspec_kw={'width_ratios': [1, 11]})
    
    # Show retention rates by cohort and period number as a heatmap.
    sns.heatmap(cohort_pivot_3, 
                mask=cohort_pivot_3.isnull(), 
                annot=True, 
                fmt='.0%', 
                cmap='RdYlGn', 
                ax=ax[1])
    ax[1].set_title('Monthly Cohorts: User Retention Rate', fontsize=16)
    ax[1].set(xlabel='Month of Journey',
              ylabel='')

    # Show cohort sizes by cohort and period number as a heatmap.
    cohort_size_df = pd.DataFrame(cohort_size).rename(columns={0: 'no. of customers acquired'})
    white_cmap = mcolors.ListedColormap(['white'])
    sns.heatmap(   cohort_size_df, 
                annot=True, 
                cbar=False, 
                fmt='g', 
                cmap=white_cmap, 
                ax=ax[0])

    fig.tight_layout()

1) Looking at the visualization, we can figure out the cohorts that have been retained well & vice-versa. For example, we could find that customers who made their first purchase in January have the highest retention rate; indicating that customers in this cohort might stick around longer than the ones acquired in other months.

2) The highest retention rate across all cohorts is observed in month 1, with an average of 16.9%. This suggests that the onboarding experience and initial customer engagement may play a critical role in driving long-term retention and loyalty.

3) Looking at the cohort retention rates over time, we can see that the average retention rate across all cohorts stabilizes at around 20-25% after month 3. This shows that customers who remain active beyond the initial few months are more likely to remain engaged with the brand over the long term.

4) While the retention rates for some cohorts drop off very quickly (e.g., customers acquired in October 2010), others exhibit more gradual declines over time. This suggests that different customer segments may have varying needs and preferences when it comes to ongoing engagement and retention strategies.

5) Overall, the retention rates tend to decrease as the months’ progress, indicating that customers are less likely to remain active with the brand as time goes on. This is some useful info that we could pass along to the marketing retention team to help them step up their game.

Additionally, we can also plot the overall retention rate of the organization out of this data cube which would hint at the months when we are losing our customers.

# Compute the average retention rate for each period number

avg_retention_rates = df_cohort_final.groupby('period_number')['retention_rate_pc'].mean().reset_index()

# Set up the figure and axes

fig, ax = plt.subplots(figsize=(12, 8))

# Plot the line chart using seaborn

sns.lineplot(x="period_number", y="retention_rate_pc", data=avg_retention_rates, ax=ax, color='darkred', ci = None)
#plt.fill_between(x="period_number", y1="retention_rate_pc", data=avg_retention_rates, alpha=0.3, color='darkgreen')

# Add annotations to the line chart

for x, y in zip(avg_retention_rates['period_number'], avg_retention_rates['retention_rate_pc']):
    ax.text(x=x, y=y+1.3, s=f"{y:.1f}%", ha='center', va='bottom', color='black')

# Set the title and axis labels

ax.set_title("Overall Retention Rate Over Time")
ax.set_xlabel("Month of Journey")
ax.set_ylabel("Retention Rate (%)")

# Set the x-axis tick locations and labels

ax.set_xticks(avg_retention_rates['period_number'])
ax.set_xticklabels(avg_retention_rates['period_number'], rotation=0, ha='right')

# Display the plot

plt.show()

1) Here we can see that the retention rate drops sharply to under 20% in the second month. This suggests that the business may want to focus on improving the customer experience during the first month of its journey to reduce churn.

2) The gradual improvement in retention rate over time shows that efforts to improve customer satisfaction can pay off in the long run.

3) However, the drop in retention rate in the twelfth month suggests that there may be opportunities to retain customers beyond the first year of their journey, and the business could explore strategies to address this issue.

The business could consider offering personalized recommendations or promotions based on past purchases to entice customers to return. Additionally, by slicing and dicing the data further by the most selling categories or subcategories, the business can identify which products are driving customer retention and which ones are causing churn. This can help the business to make informed decisions about product offerings and marketing strategies, which in turn can help to improve customer satisfaction and increase lifetime value.

Step 12: Visualize Customer Life Time Value:

#type1: Create a pivot table to display traditional_ltv by cohort and period number.

cohort_pivot_1 = df_cohort_final.pivot_table(index = 'cohort',
                                     columns = 'period_number',
                                     values = 'traditional_ltv')

#type2: Create a pivot table to display traditional_ltv by period number and cohort.

cohort_pivot_2 = df_cohort_final.pivot_table(index = 'period_number',
                                     columns = 'cohort',
                                     values = 'traditional_ltv')


#type3: Convert traditional_ltv percentages to absolute values.
    
cohort_pivot_3 = df_cohort_final.pivot_table(index = 'cohort',
                                     columns = 'period_number',
                                     values = 'traditional_ltv')

cohort_size_values = df_cohort_final.pivot_table(index = 'cohort',
                                     columns = 'period_number',
                                     values = 'traditional_ltv')

cohort_size = cohort_size_values.iloc[:,0]

with sns.axes_style("white"):
    fig, ax = plt.subplots(1, 2, figsize=(12, 8), sharey=True, gridspec_kw={'width_ratios': [1, 11]})
    
    # Show churn rates by cohort and period number as a heatmap.
    
    sns.heatmap(cohort_pivot_3, 
                mask=cohort_pivot_3.isnull(), 
                annot=True, 
                fmt='', 
                cmap='RdYlGn', 
                ax=ax[1])
    ax[1].set_title('Monthly Cohorts: Customer Lifetime Value', fontsize=16)
    ax[1].set(xlabel='Month of Journey',
              ylabel='')

     # Show cohort sizes by cohort and period number as a heatmap.
     
    cohort_size_df = pd.DataFrame(cohort_size).rename(columns={0: 'No. of customers acquired'})
    white_cmap = mcolors.ListedColormap(['white'])
    sns.heatmap(   cohort_size_df, 
                annot=True, 
                cbar=False, 
                fmt='g', 
                cmap=white_cmap, 
                ax=ax[0])

    fig.tight_layout()

1) High CLTV for the December 2009 cohort: This suggests that the business may want to consider running a targeted marketing campaign to encourage repeat purchases from customers in this cohort. We could also explore opportunities to upsell or cross-sell to these customers to increase their overall lifetime value.

2) Low CLTV for certain cohorts: Customers who were acquired in February, March, April, and May 2010 have low CLTV. This highlights the potential for businesses to provide tailored recommendations and promotions to these customers, taking into account their unique preferences and purchase history.

# Compute the average retention rate for each period number

avg_retention_rates = avg_retention_rates[avg_retention_rates['period_number'] <= 10]

# Set up the figure and axes

fig, ax = plt.subplots(figsize=(12, 8))

# Plot the line chart using seaborn

sns.lineplot(x="period_number", y="traditional_ltv", data=avg_retention_rates, ax=ax, color='darkred', ci = None)
#plt.fill_between(x="period_number", y1="retention_rate_pc", data=avg_retention_rates, alpha=0.3, color='darkgreen')

# Add annotations to the line chart

for x, y in zip(avg_retention_rates['period_number'], avg_retention_rates['traditional_ltv']):
    ax.text(x=x, y=y+3.5, s=f"${y:.1f}", ha='center', va='bottom', color='black')

# Set the title and axis labels

ax.set_title("Overall CLTV Over Time")
ax.set_xlabel("Month of Journey")
ax.set_ylabel("CLTV ($)")

# Set the x-axis tick locations and labels

ax.set_xticks(avg_retention_rates['period_number'])
ax.set_xticklabels(avg_retention_rates['period_number'], rotation=0, ha='right')

# Display the plot

plt.show()

The overall CLTV graph shows us the traditional lifetime value of customers at the organization, starting from the first month when a customer gets onboarded to the organization, and modeling all the way until their 10th month of the customer journey.

Based on the chart provided, it is evident that a profitable acquisition cost for customers who have been with us for 8 months would be around 310. This means that if a customer remains with us for 8 months, they are worth 310. Assuming that the cost of acquiring a new customer in FY2010 was 35, the CAC to LTV ratio would be 6:1, which is considered favorable for a retail business.

Segment customers based on LTV:

In this code snippet, we basically grouped the dataset by cohort, transaction year-month, period number, and customer ID to identify customers in each cohort. Further, we filtered the customer data to only keep customers who have a valid CLTV value.

In the following stages, we performed supervised segmentation in order to group customers based on their CLTV score. Customers whose CLTV score is at or above the 80th percentile were classified as “high_cltv”, while those with a score between the 50th and 80th percentile were classified as “medium_cltv”. Customers with a score below the median were classified as “low_cltv”.

Overall, this code is an important step toward identifying and segmenting customers based on their CLTV values, which can in turn be used to predict future Customer Life Time Value.

#Customers in each cohort

cohort_customers = output_data.groupby(['cohort', 'record_level_transaction_yr_month', 'period_number', 'customer_id']) \
                             .agg(cltv_interim=('traditional_ltv', 'min')) \
                             .reset_index()

cohort_customers = pd.merge(cohort_customers, df_cohort_final, on = ['cohort', 'record_level_transaction_yr_month', 'period_number'], how='left')

cohort_customers["ltv_flag"] = pd.Series(np.where(cohort_customers["traditional_ltv"].notna() ==True,1, 0))

cohort_customers = cohort_customers[cohort_customers["ltv_flag"] == 1]

#Customer Segments by CLTV

customers_ltv = cohort_customers.groupby(['customer_id'])['cohort','period_number', 'traditional_ltv'].max().reset_index()

# Calculate the 80th percentile of traditional_ltv

traditional_ltv_80p = df_cohort_final.traditional_ltv.quantile(0.8)

# Create a new column with "high_cltv" for customers with traditional_ltv >= 80th percentile, and "unknown" for others

customers_ltv["traditional_ltv_segments"] = np.where(customers_ltv["traditional_ltv"] >= traditional_ltv_80p, "high_cltv", "unknown")

# Calculate the 50th and 80th percentile of traditional_ltv

q_low, q_high = customers_ltv["traditional_ltv"].quantile([0.5, 0.8])

# Create a boolean mask for traditional_ltv values between the 50th and 80th percentile

mask = (q_low <= customers_ltv["traditional_ltv"]) & (customers_ltv["traditional_ltv"] < q_high)

# Replace values in the "traditional_ltv_segments" column that meet the mask criteria with "medium_cltv"

customers_ltv["traditional_ltv_segments"] = customers_ltv["traditional_ltv_segments"].mask(mask, "medium_cltv")

# Calculate the median of traditional_ltv from df_cohort_final

traditional_ltv_median = df_cohort_final.traditional_ltv.quantile(0.5)

# Create a boolean mask to identify traditional_ltv values less than the median

traditional_ltv_mask = customers_ltv["traditional_ltv"] < traditional_ltv_median

# Assign "low_cltv" to the traditional_ltv_segments column where the mask is True

customers_ltv.loc[traditional_ltv_mask, "traditional_ltv_segments"] = "low_cltv"

Segment customers based on LTV:

To accurately predict cohort-wise customer lifetime value and Retention Rate, I have utilized various imputation methods including Bayesian, KNN, and random forest. I found that random forest was the most effective method for filling in missing data in the cohort retention matrix for the chosen transactional customer dataset. With this powerful tool, we can confidently predict future CLTV and retention rates in the cohort matrix.

Check out the code below for a demonstration of how we can implement these techniques in Python.

Step 14: Predict Customer Life Time Value:

The first step is to split the data into features (X) and target (y), where X contains the row and column indices and y contains the customer lifetime values.

Then, a random forest regressor is trained on the non-missing values of the data using the scikit-learn RandomForestRegressor class. To evaluate the performance of the random forest regressor, I split the data into a training set and a test set, and calculated metrics such as mean squared error (MSE) and R-squared (R²) on the test set.

Further, I did hyperparameter tuning using the random search technique to search over a range of hyperparameters and to find the best combination of hyperparameters that optimizes a performance metric such as R-squared on a validation set.

The trained model is used to predict the missing values, and the missing values in the original data array are replaced with the predicted values. Finally, the output data is visualized using heatmaps in Seaborn and Matplotlib.

cohort_pivot_3 = df_cohort_final.pivot_table(index = 'cohort',
                                     columns = 'period_number',
                                     values = 'traditional_ltv')

data = cohort_pivot_3.values

# Split the data into features (X) and target (y)
# X contains the row and column indices
# y contains the customer lifetime value

X = np.argwhere(~np.isnan(data))
y = data[~np.isnan(data)]

# Split the data into training and test sets

X_train, X_test, y_train, y_test = train_test_split(X, y, test_size=0.2, random_state=42)

# Define the imputation methods

imputation_methods = {
    'Random Forest': RandomForestRegressor(n_estimators=100, random_state=42),
    'Bayesian': HistGradientBoostingRegressor(random_state=42),
    'KNN': KNeighborsRegressor(n_neighbors=5)
   
}

# Train each imputation method using the training set and evaluate its performance using R-squared score

r2_scores = {}
for name, method in imputation_methods.items():
    # Fit the imputation method on the training set
    method.fit(X_train, y_train)
    # Predict the missing values in the test set
    y_pred = method.predict(X_test)
    # Evaluate the performance using R-squared score
    r2_scores[name] = r2_score(y_test, y_pred)

# Print the R-squared scores for each imputation method

print("R-squared scores:")
for name, score in r2_scores.items():
    print(f"{name}: {score:.2f}")


# Select the imputation method with the best performance

best_method_name = max(r2_scores, key=r2_scores.get)
best_method = imputation_methods[best_method_name]
print(f"\nBest imputation method: {best_method_name}")


# Define the hyperparameter search space

param_distributions = {
    'n_estimators': [100, 200, 300, 400, 500],
    'max_depth': [10, 20, 30, None],
    'min_samples_split': [2, 5, 10],
    'min_samples_leaf': [1, 2, 4],
    'max_features': ['auto', 'sqrt', 'log2']
}

# Train a random forest regressor using random search with cross-validation

rf = RandomForestRegressor()
rs = RandomizedSearchCV(rf, param_distributions, n_iter=100, cv=3, scoring='r2', random_state=42)
rs.fit(X_train, y_train)


# Print the best hyperparameters

print("Best hyperparameters: ", rs.best_params_)

# Predict the missing values in the original data array using the best imputation method

# Replace the missing values in the original data array with the predicted values

predicted_values = best_method.predict(np.argwhere(np.isnan(data)))
data_predicted = data.copy()
data_predicted[np.isnan(data)] = predicted_values

# Convert the data to a DataFrame and add row and column indices

df = pd.DataFrame(data_predicted,index=[ '2009-12', '2010-01', '2010-02', '2010-03', '2010-04', '2010-05', '2010-06','2010-07', '2010-08', '2010-09','2010-10', '2010-11'], columns=['0', '1', '2', '3', '4', '5', '6', '7', '8', '9', '10', '11', '12'])


# Create a heatmap with actual and predicted values distinguished by different colors

sns.set(font_scale=0.8)
fig, ax = plt.subplots(figsize=(12, 8))
sns.heatmap(df, cmap='YlGn', annot=False, fmt=".2f",  cbar=False, ax=ax)
for i in range(df.shape[0]):
    for j in range(df.shape[1]):
        value = df.iloc[i, j]
        if np.isnan(data[i, j]):
            text_color = 'red'
        else:
            text_color = 'black'
        ax.text(j + 0.5, i + 0.5, f'{value:.2f}', ha='center', va='center', color=text_color)
ax.set_title("Cohort Matrix with Heatmap")
ax.set_xlabel("Month of Customer Journey")
ax.set_ylabel("Month when Customer got Acquired")
plt.show() 


What’s Next?

1) Productionize CLTV Model: Run the CLTV model monthly and compare actual vs. predicted results. Create API endpoints and ensure that you feed the current and predicted lifetime values of each customer into your organization’s Customer Data Platform. Collaborate with your marketing automation team to use these customer attributes for targeted web push, SMS push, browser pop-ups, social media ads, and email marketing initiatives.

2) Segment your top-performing customers: Identify your highest customer lifetime value cohort groups and work closely with your marketing communications team to set up upselling and cross-selling marketing campaigns. These campaigns can be run through paid and organic marketing channels and will help you maximize your return on investment.

3) Set up Marketing Retention Campaigns: Identify the customers in the cohorts that have a higher churn rate and initiate retention campaigns. These campaigns can include refer-a-friend gift vouchers, coupon codes, promotions, loyalty programs, and other targeted paid and organic marketing initiatives. Building a long-term relationship with your customers is crucial, so be sure to evaluate the effectiveness of these campaigns by measuring the CLTV and retention rate of those cohorts in subsequent months.

4) Analyze top-selling categories and subcategories: Keep track of which products or services generate the most revenue and identify any CLTV and Retention patterns in customer behavior. Use this information to develop targeted marketing campaigns and optimize your product offerings.

5) Import Customer Acquisition Cost: Overlay customer acquisition cost on top of the CLTV values to benchmark and evaluate the organization’s ongoing marketing campaign initiatives. This will provide valuable insights into the cost-effectiveness of different campaigns and channels.

6) Share Key Findings: Keep your sales and marketing team in the loop by communicating significant insights related to customer retention rate and lifetime value from the cohort analysis and CLTV predictions. Additionally, inform your marketing retention team about any noteworthy patterns that are identified during this journey.

I hope these actions will help you maximize your customer lifetime value and build stronger relationships with your customers. Remember, these are ongoing processes, so continue to refine your strategy and adjust your tactics based on what works best for your business. Good luck.

Conclusion:

In conclusion, predicting customer lifetime value through cohort analysis in Python is an essential skill for any business owner or marketer. Cohort analysis can help you identify customer behavior patterns, while machine learning techniques can be used to predict future customer actions. By applying these techniques, you can optimize your marketing campaigns, improve your profits, and make better decisions about your customers.

I hope this post has helped get you started and encouraged you to explore the world of CLTV modeling. The possibilities are endless, and the results could be game-changing for your business. So, start implementing these techniques and see the positive impact on your business growth. Thank you for reading!

GitHub Repository

I have learned (and continue to learn) from many folks in Github. Hence sharing my entire python script and supporting files in a public GitHub Repository in case if it benefits any seekers online. Also, feel free to reach out to me if you need any help in understanding the fundamentals of supervised machine learning algorithms in Python. Happy to share what I know:) Hope this helps!